DKube Developer’s Guide
This section provides instructions on how to develop code that will integrate with the DKube system.
File Paths
For IDE & Run jobs, DKube provides a method to access the files in code, data, and model repositories without needing to know the exact folder within the DKube storage hierarchy. The repos are available in the following paths:
Repo Type |
Path |
|---|---|
Code |
Fixed path: /mnt/dkube/workspace |
Dataset |
Mount path as described at Mount Path |
Model |
Mount path as described at Mount Path |
The Dataset & Model repos are available at the following paths in addition to the user-configured mount paths:
Repo Type |
Path |
|---|---|
Dataset |
/mnt/dkube/datasets/<user name>/<dataset name> |
Model |
/mnt/dkube/models/<user name>/<dataset name> |
In the case of AWS ( Amazon S3 ) and Redshift ( Amazon Redshift ), the mount paths also include the metadata files with the endpoint configuration.
Configuration File
A configuration file can be uploaded into DKube for an IDE ( Configuration Screen) or Run ( Configuration File ). The configuration file can be accessed from the code at the following location:
/mnt/dkube/config/<config file name> |
Home Directory
DKube maintains a home directory for each user, at the location:
/home/<user name> |
Files for all user-owned resources are created in this area, including metadata for Runs, IDEs, & Inferences. These can be accessed by an IDE.
The following folders are created within the home directory.
Workspace |
Contains folders for each Code Repo owned by the user. These can be updated from a source git repo, edited and committed back to git repo. |
Dataset |
Contains folders for each Dataset Repo owned by the user. Each Dataset folder contains subdirectories for each version with the dataset files for the version. |
Model |
Contains folders for each Model Repo owned by the user. Each Model directory contains subdirectories for each version with the model files for the version. |
Notebook |
Contains metadata for user IDE instances |
Training |
Contains metadata for user Training Run instances |
Preprocessing |
Contains metadata for user Preprocessing Run instances |
Inference |
Contains metadata for user Inference instances |
Amazon S3
DKube native support for Amazon S3. In order to use Redshift within DKube, a Repo must first be created. This is desribed at Add a Dataset . This section describes how to access the data and integrate it into your program. The mount path for the S3 Dataset repo contains the config.json & credentials files.
config.json
{
  "Bucket": "<bucket name>",
  "Prefix": "<prefix>",
  "Endpoint": "<endpoint>"
}
credentials
[default]
aws_access_key_id = xxxxxxx
aws_secret_access_key = xxxxxx
In addition, the path /etc/dkube/.aws contains the metadata and credentials for all of the S3 Datasets owned by the user.
/etc/dkube/.aws/config
[default]
bucket = <bucket name 1>
prefix = <prefix 1>
[dataset-2]
bucket = <bucket name 2>
prefix = <prefix 2>
[dataset-3]
bucket = <bucket name 3>
prefix = <prefix 3>
/etc/dkube/.aws/credentials
[default]
aws_access_key_id = xxxxxxx
aws_secret_access_key = xxxxxxxxx
[dataset-2]
aws_access_key_id = xxxxxxx
aws_secret_access_key = xxxxxxxxx
[dataset-3]
aws_access_key_id = xxxxxxx
aws_secret_access_key = xxxxxxxxx
Amazon Redshift
DKube has native support for Amazon Redshift. In order to use Redshift within DKube, a Repo must first be created. This is described at Add a Dataset . This section describes how to access the data and integrate it into your program. Redshift-specific environment variables are listed at Redshift Variables . Redshift can be accessed with or without an API server.
Redshift Access Configuration
Redshift Access with an API Server
In order to configure the API server to fetch the metadata, a kubernetes config map is configured with the following information:
Variable |
Description |
|---|---|
TOKEN |
Security token for the API server |
ENDPOINT |
url for the API server |
DKube fetches the list of databases available and associated configuration information such as endpoints and availability region. Additionally, DKube fetches the schemas of the databases from the API server.
Redshift Access without an API Server
By default, DKube will use the following query to fetch the redshift schemas and show them as versions in DKube UI when creating a Dataset.
Accessing the Redshift Data from the Program
Redshift data can be accessed from any Notebook or Run.
The metadata to access the Redshift data for the current job is provided from the mount path ( Mount Path ) specified when the Job is created.
redshift.json
{
  "rs_name": "<name>",
  "rs_endpoint": "<endpoint>",
  "rs_database": "<database-name>",
  "rs_db_schema": "<schema-name>",
  "rs_user": "<user-name>"
}
Metadata for all of the selected Redshift datasets for the User is available at /etc/dkube/redshift.json for the Job.
[
   {
     "rs_name": "<name 1>",
     "rs_endpoint": "<endpoint 1>",
     "rs_database": "database-name 1>",
     "rs_db_schema": "<schema-name 1>",
     "rs_user": "<user 1>"
   },
   {
     "rs_name": "<name 2>",
     "rs_endpoint": "<endpoint 2>",
     "rs_database": "database-name 2",
     "rs_db_schema": "<schema-name 2>",
     "rs_user": "<user 2>"
   },
]
Redshift Password
The password for the Redshift data is stored encrypted within DKube. The code segment below can be used to retrieve the information without encryption.
This will return the datasets in the following format:
Mount Path
The mount path provides a way for the project code to access the repositories. This section describes the steps needed to enable thie access.
Before accessing a dataset, featureset, or model from the code, it needs to be created within DKube, as described at Add a Dataset and Add a Model . This will enable DKube to access the entity. The following image shows a Dataset detail screen for a GitHub dataset that has been uploaded to the DKube storage. It shows the actual folder where the dataset resides.
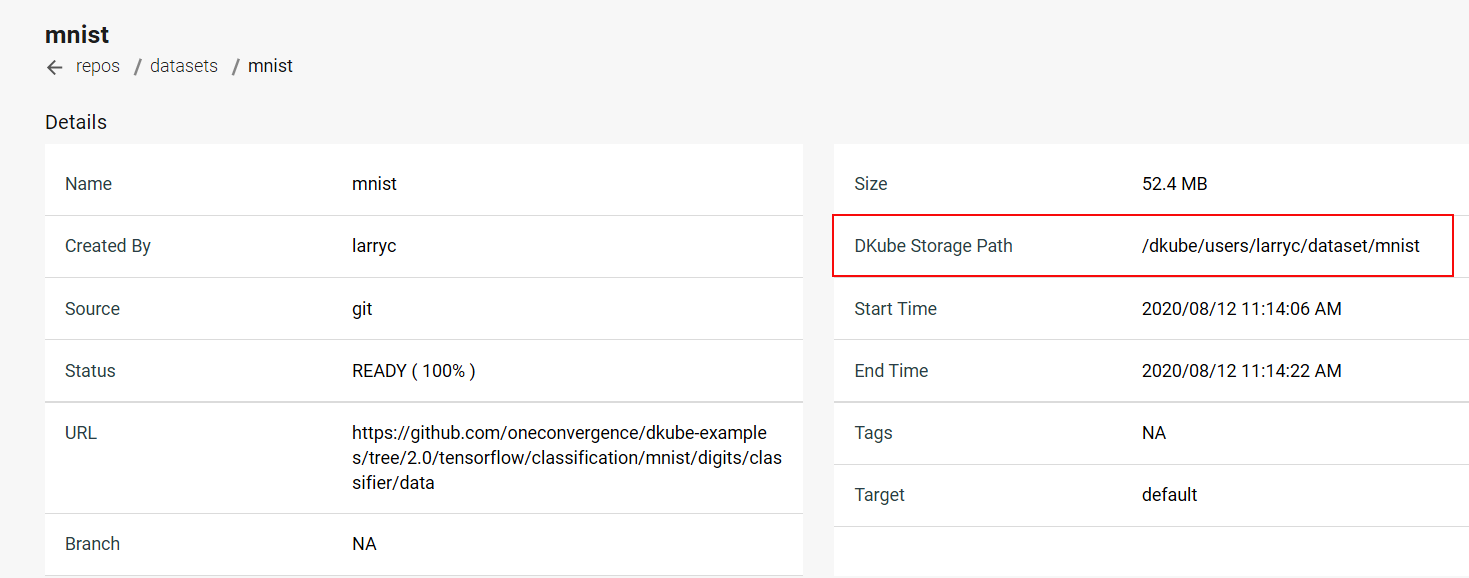
DKube allows the Project code to access the Dataset, FeatureSet, or Model without needing to know the exact folder structure through the mount path. When creating an IDE or Run, the mount path field should be filled in to correspond to the Project code.
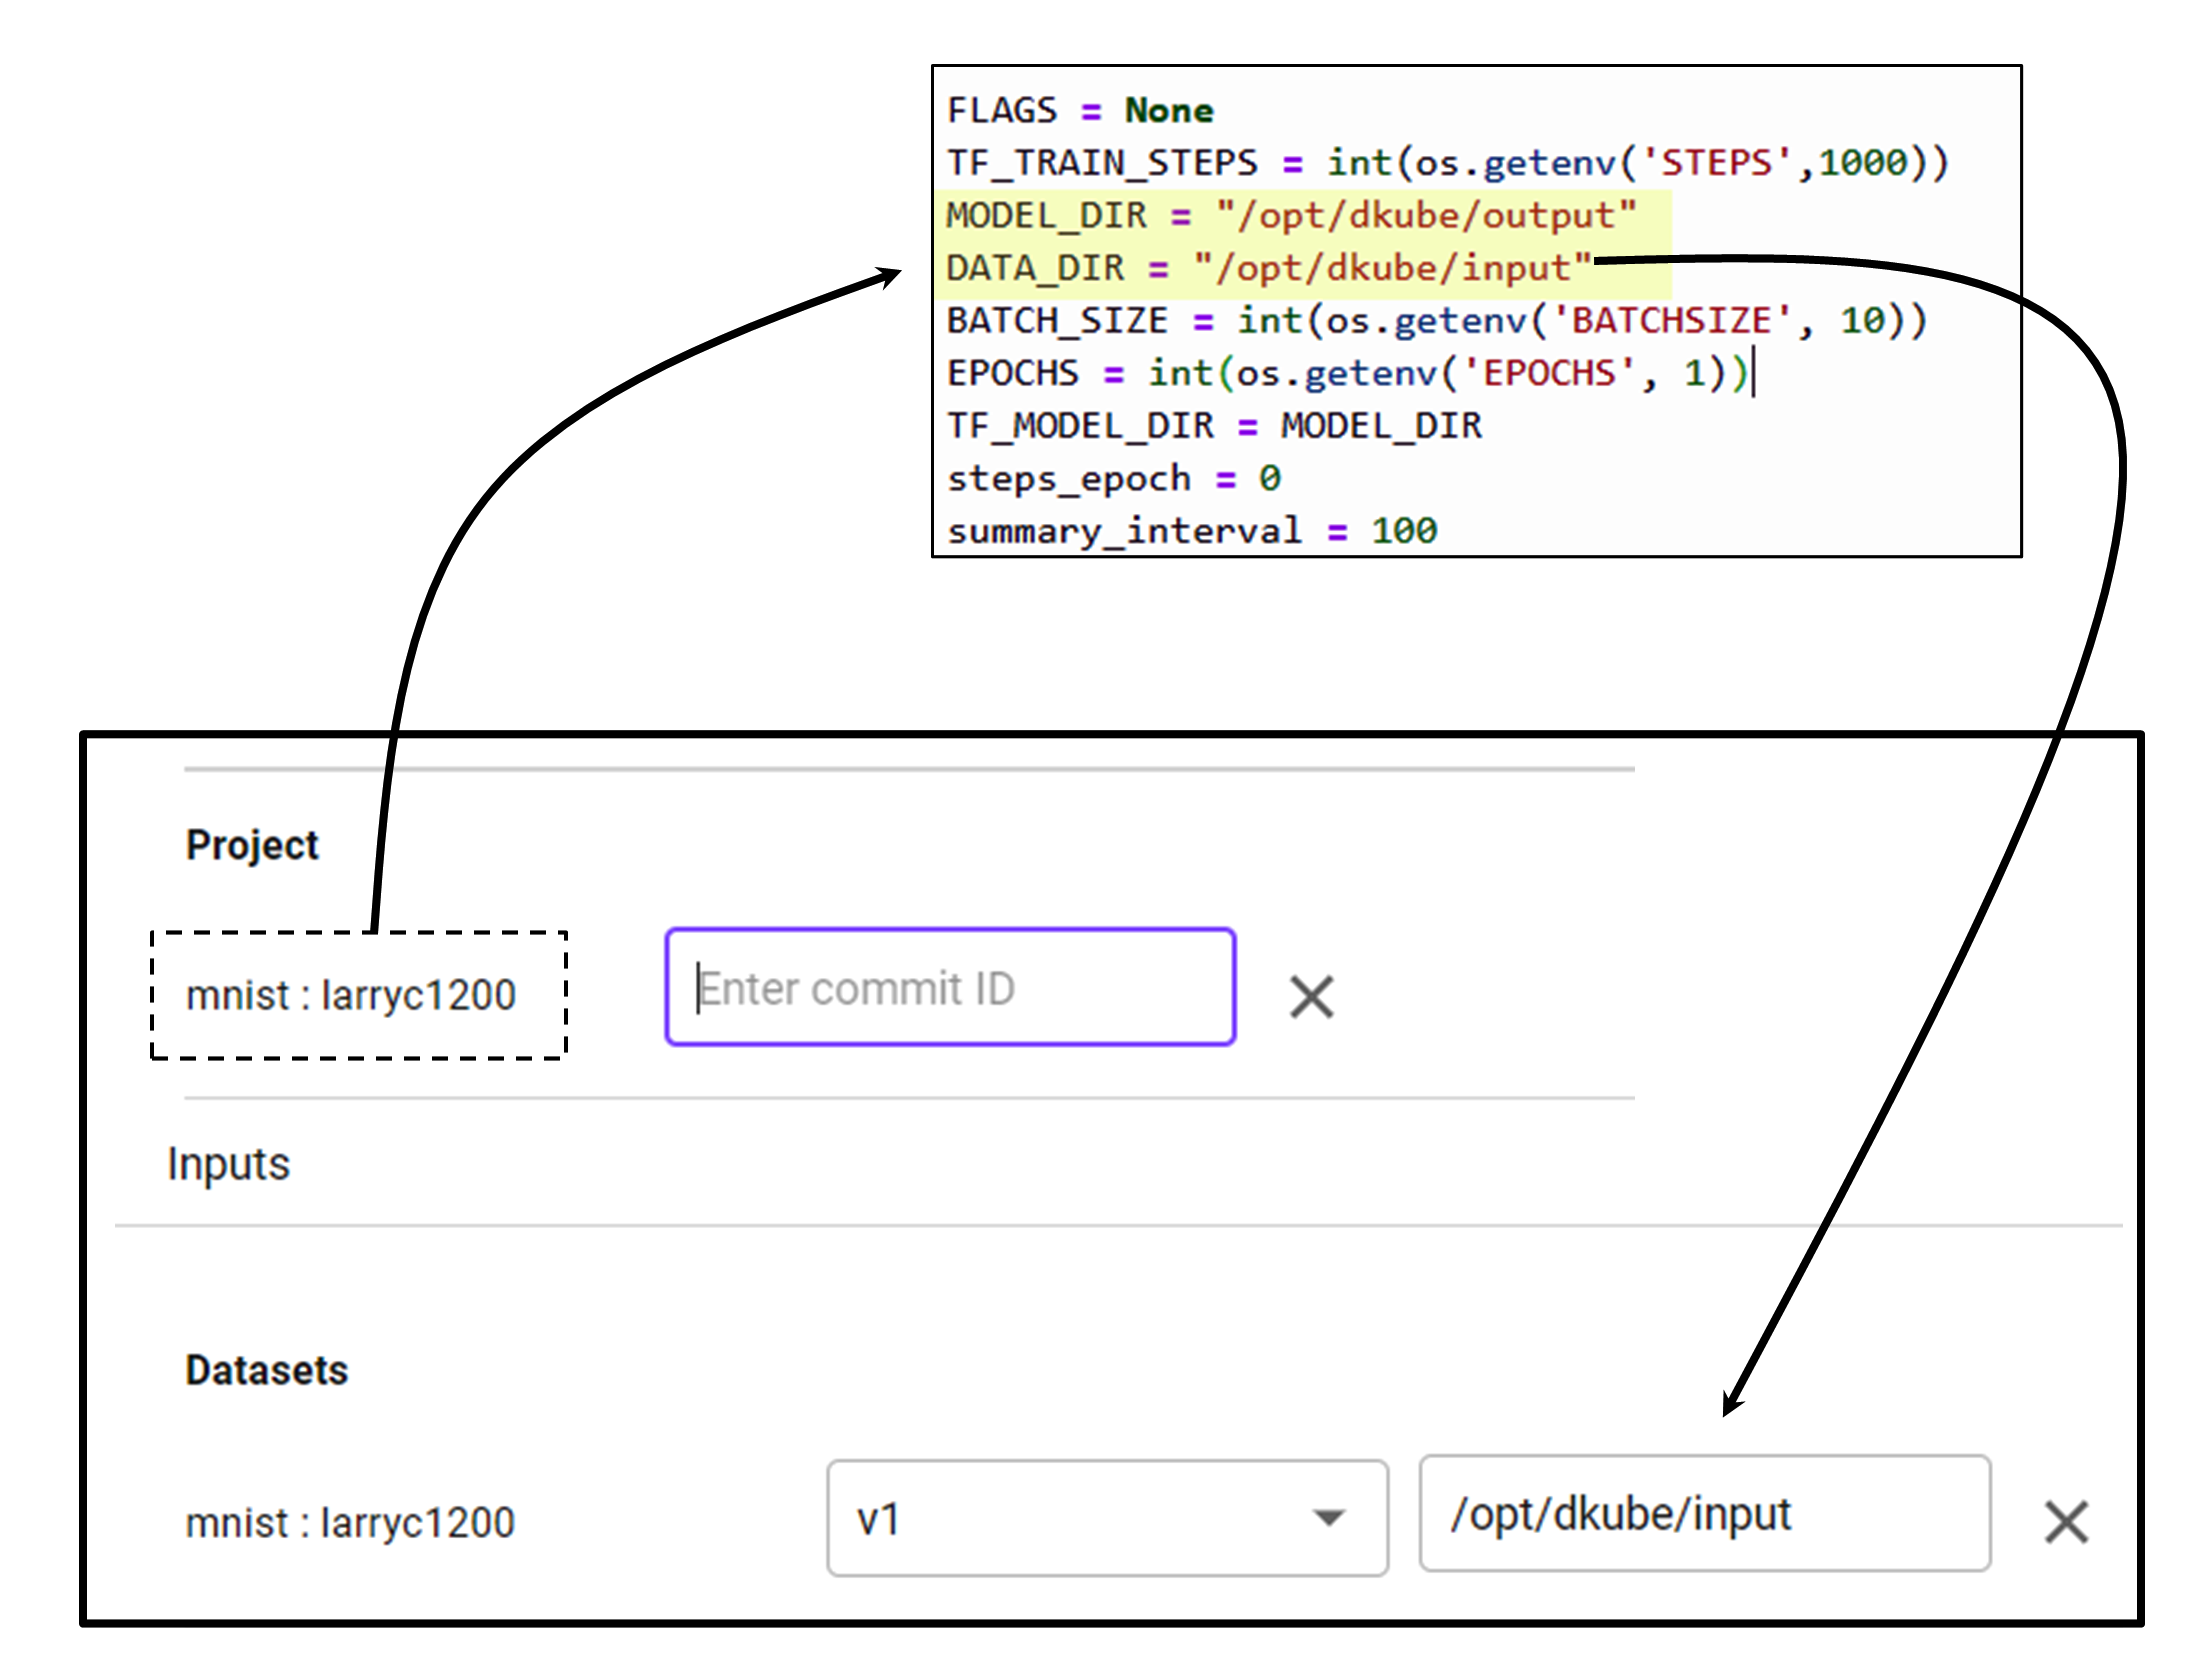
The following guidelines ensure that the mount path operates properly:
Preface the mount path with /opt/dkube/. For example, the input mount path for an input Dataset can be “/opt/dkube/input”
The code should use the same path for input and output
Environment Variables
This section describes the environment variables that allow the program code to access DKube-specific information. These are accessed from the program code through calls such as:
Note
The variables and mount paths are available in the file /etc/dkube/config.json
General Variables
Name |
Description |
|---|---|
DKUBE_URL |
API Server REST endpoint |
DKUBE_USER_LOGIN_NAME |
Login user name |
DKUBE_USER_ACCESS_TOKEN |
JWT token for DKube access |
DKUBE_JOB_CONFIG_FILE |
Configuration file specified at Job creation Configuration Screen |
DKUBE_USER_STORE |
Mount path for user-owned resources |
DKUBE_DATA_BASE_PATH |
Mount path for resources configured for an IDE/Run |
DKUBE_NB_ARGS |
Jupyterlab command line arguments containing auth token, base url and home dir, used in entrypoint for Jupyterlab |
KF_PIPELINES_ENDPOINT |
REST API endpoint for pipelines to authenticate pipeline requests. If not set, pipelines are created without authentication |
DKUBE_JOB_CLASS |
Type of Job (training, preprocessing, custom, notebook, rstudio, inference, tensorboard) |
DKUBE_JOB_ID |
Unique Job ID |
DKUBE_JOB_UUID |
Unique Job UUID |
Variables Passed to Jobs
The user can provide program variables when creating an IDE or Run, as described at Configuration Screen . These variables are available to the program based on the variable name. Some examples of these are shown here.
Name |
Description |
|---|---|
STEPS |
Number of training steps |
BATCHSIZE |
Batchsize for training |
EPOCHS |
Number of training epochs |
Repo Variables
Name |
Description |
|---|---|
S3 |
|
S3_BUCKET |
Storage bucket |
S3_ENDPOINT |
URL of server |
S3_VERIFY_SSL |
Verify SSL in S3 Bucket |
S3_REQUEST_TIMEOUT_MSEC |
Request timeout for Tensorflow to storage connection in milliseconds |
S3_CONNECT_TIMEOUT_MSEC |
Connection timeout for Tensorflow to storage connection in milliseconds |
S3_USE_HTTPS |
Use https (1) or http (0) |
AWS |
|
AWS_ACCESS_KEY_ID |
Access key |
AWS_SECRET_ACCESS_KEY |
Secret key |
Redshift Variables
Name |
Description |
|---|---|
DKUBE_DATASET_REDSHIFT_CONFIG |
Redshift dataset metadata for user owned Redshift datasets |
DKUBE_DATASET_REDSHIFT_DB_SCHEMA |
Schema |
DKUBE_DATASET_REDSHIFT_ENDPOINT |
Dataset url |
DKUBE_DATASET_REDSHIFT_DATABASE |
Database name |
DKUBE_DATASET_NAME |
Dataset name |
DKUBE_DATASET_REDSHIFT_USER |
User name |
DKUBE_DATASET_REDSHIFT_CERT |
SSL Certificate |
Hyperparameter Tuning Variables
Name |
Description |
|---|---|
DKUBE_JOB_HP_TUNING_INFO_FILE |
Configuration file specified when creating a Run |
PARENT_ID |
Unique identifier (uuid) |
OBJECTIVE_METRIC_NAME |
Objective metric |
TRIAL |
Count of trial runs |
DKube SDK
One Convergence provides an SDK to allow direct access to DKube actions. In order to make use of this, the SDK needs to be called at the start on the code. An SDK guide is available at:
Kubeflow Pipelines Template
Kubeflow Pipelines provide a powerful mechanism to automate your workflow. DKube supports this capability natively, as described at Kubeflow Pipelines and Kubeflow Pipelines . One Convergence offers templates and examples to make pipeline creation convenient.
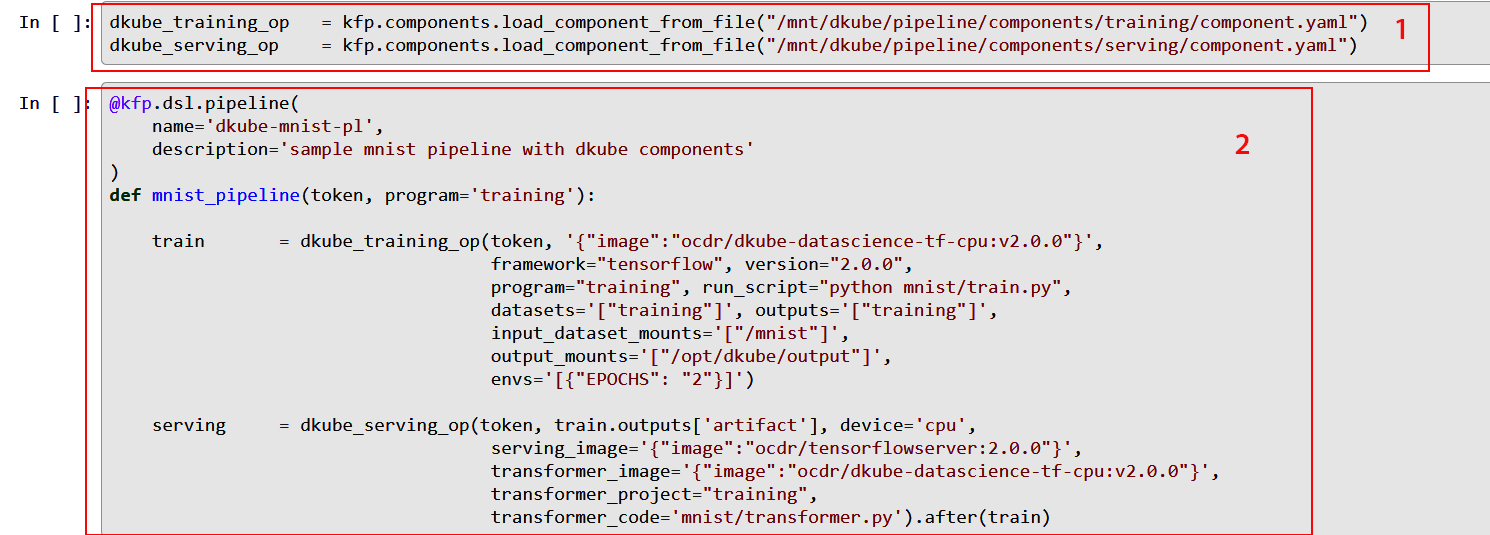
One Convergence provides a set of component definition files for the necessary functions needed to create a pipeline within DKube (item 1). The files include:
A description of the component
A list of inputs and outputs that the component accepts
Metadata that allow the component to be run within DKube as a pod
The files are provided for:
Training
Preprocessing
Serving
They are located in the folder /mnt/dkube/pipeline/components.
These components are called by the DSL pipeline description (item 2), and allow the developer to focus on the specific inputs and outputs required by the Job rather than the details of how those fields get translated at the lower levels. The DSL compliler will convert the DSL into a pipeline YAML file, which can be passed to Kubeflow to run.
An example of using the templates to create a pipeline is found at https://github.com/oneconvergence/dkube-training/tree/main/mnist. The file pipeline.ipynb uses the template to create a pipeline within DKube.
MLFlow Metrics
Metric logging is handled through MLFlow APIs. The APIs that are supported are defined at:
https://www.mlflow.org/docs/latest/python_api/mlflow.html#mlflow.log_metric https://www.mlflow.org/docs/latest/python_api/mlflow.html#mlflow.log_metrics https://www.mlflow.org/docs/latest/python_api/mlflow.html#mlflow.autolog
Custom Container Images
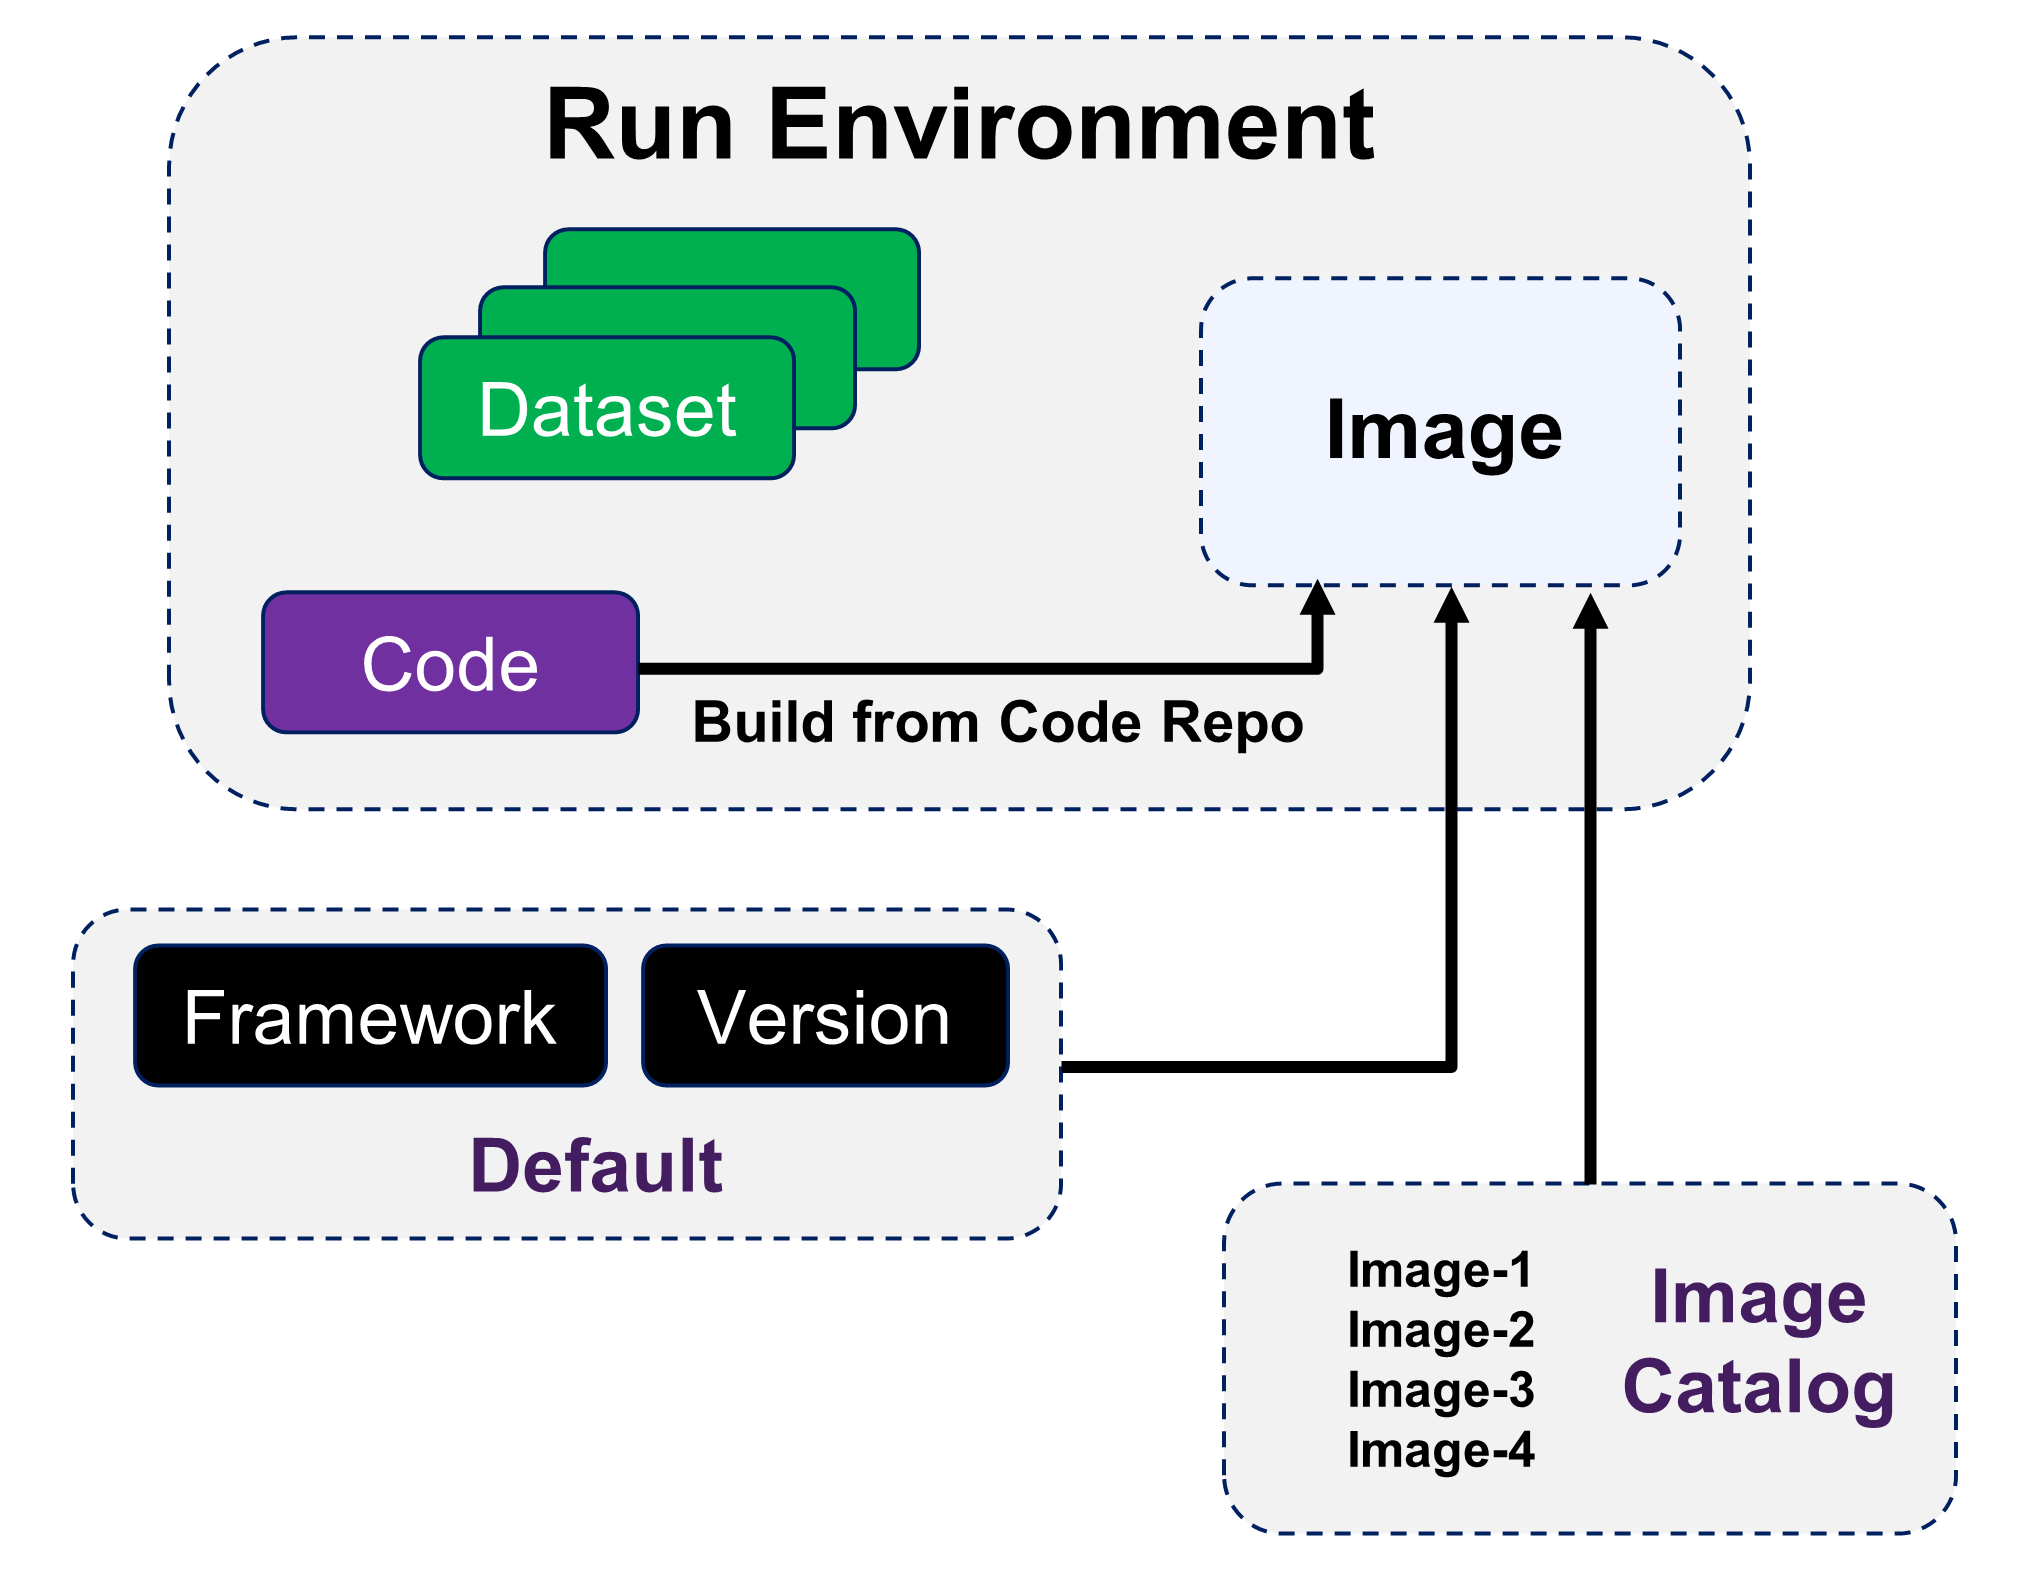
DKube jobs run within container images. The image is selected when the Job is created. The image can be from several sources:
DKube provides standard images based on the framework, version, and environment
An image can be created when the Job is executed based on the code repo Build From Code Repo
A user-generated catalog of pre-built images can be used for the Job Images
If the standard DKube Docker image does not provide the packages that are necessary for your code to execute, you can create a custom Docker image and use this for IDEs and Runs. There are several different ways that DKube enables the creation and use of custom images.
Manual Image Creation
This section describes the process to build a custom Docker image manually.
Getting the Base Image
In order to create a custom image for DKube, you can start with the standard DKube image for the framework and version, and add the packages that you need. The standard images for DKube are:
Framework |
Version |
CPU/CPU |
Image |
|---|---|---|---|
TensorFlow |
1.14 |
CPU |
ocdr/d3-datascience-tf-cpu:v1.14-1 |
TensorFlow |
1.14 |
GPU |
ocdr/d3-datascience-tf-gpu:v1.14-1 |
TensorFlow |
2.0 |
CPU |
ocdr/dkube-datascience-tf-cpu:v2.0.0-1 |
TensorFlow |
2.0 |
GPU |
ocdr/dkube-datascience-tf-gpu:v2.0.0-1 |
Pytorch |
1.6 |
CPU |
ocdr/d3-datascience-pytorch-cpu:v1.6-1 |
PyTorch |
1.6 |
GPU |
ocdr/d3-datascience-pytorch-gpu:v1.6-1 |
Scikit Learn |
0.23.2 |
CPU |
ocdr/d3-datascience-sklearn:v0.23.2-1 |
Adding Your Packages
In order to add your packages to the standard DKube image, you create a Dockerfile with the packages included. The Dockerfile commands are:
Building the Docker Image
The new image can be built with the following command:
Pushing the Image to Docker Hub
In order to push the image, login to Docker Hub and run the following command:
Using the Custom Image within DKube
When starting a Run or IDE, select a Custom Container and use the name of the image that was saved in the previous step. The form of the image will be:
JupyterLab Custom Images
When creating a custom image for use in a JupyterLab notebook within DKube, you must include the steps that provide the jovyan user sudo permissions. This allows that user to install system packages within the notebook.
FROM jupyter/base-notebook:latest

ENV DKUBE_NB_ARGS ""
USER root
RUN echo "$NB_USER ALL=(ALL) NOPASSWD:ALL" > /etc/sudoers.d/notebook
USER jovyan
CMD ["sh", "-c", "jupyter lab --ip=0.0.0.0 --port=8888 --allow-root $DKUBE_NB_ARGS"]
CI/CD Image Creation
DKube provides an automated method to:
Build and push images to a Docker registry based on a trigger
Execute an automated set of steps through DKube
Setting up the Repository
In order for the CI/CD system to operate, the repository needs to be set up with the files that provide the action instructions. The directory structure should be as follows:
Repository Root
     |
     |--- .dkube-ci.yml
     |
The other folders and files described in this section can be in any folder, since the .dkube-ci.yml file will identify them by their path.
CI/CD Actions
The file .dkube-ci.yml is used by the CI/CD system to find the necessary files to execute the commands. The general format of the .dkube-ci.yml file is as follows:
The following types of actions are supported by the CI/CD mechanism.
Declaration |
Description |
|---|---|
Dockerfile: |
Build and push a Docker image using a Dockerfile |
conda-env: |
Build and push a Docker image using the Conda environment |
docker_envs: |
Register existing Docker images with DKube |
images: |
Build other Docker images |
jobs: |
Add a DKube Jobs template or run Jobs |
components: |
Build a Kubeflow component |
pipelines: |
Compile, Deploy, and Run a Kubeflow pipeline |
path: |
Folder path to file, referenced from the base of the repository |
Folder Path
The path: declaration can have a hierarchical designation. So, for example, if the file is in the hierarchy “folder1/folder2”, as referenced from the base repository, the “path:” declaration would have that hierarchy.
Combining Declarations
The declarations can be combined in any order.
Important
The actions from the declarations are run in parallel, except for the Pipeline step, which waits for the components to be built. For others, such as the Jobs: declaration, the image must already have been built and ready for use.