DKube Developer’s Guide
This section provides instructions on how to develop code that will integrate with the DKube platform.
File Paths
For IDE & Run jobs, DKube provides a method to access the files in code, data, and model repositories without needing to know the exact folder within the DKube storage hierarchy. The repos are available in the following paths:
Repo Type |
Path |
|---|---|
Code |
Fixed path: /mnt/dkube/workspace |
Dataset |
Mount path as described at Mount Path |
Model |
Mount path as described at Mount Path |
The Dataset & Model repos are available at the following paths in addition to the user-configured mount paths:
Repo Type |
Path |
|---|---|
Dataset |
/mnt/dkube/datasets/<user name>/<dataset name> |
Model |
/mnt/dkube/models/<user name>/<dataset name> |
In the case of Amazon S3 and Amazon Redshift the mount paths also include the metadata files with the endpoint configuration.
Configuration File
A general purpose configuration file can be uploaded into DKube, as described in the following sections:
Job Type |
Details |
|---|---|
IDE |
|
Run |
The configuration file can be accessed from the code at the follosing location:
/mnt/dkube/config/<config file name>
Home Directory
DKube maintains a home directory for each user, at the location:
/home/<user name>
Files for all user-owned resources are created in this area, including metadata for Runs, IDEs, & Inferences. These can be accessed by an IDE.
The following folders are created within the home directory:
Workspace |
Contains folders for each Code Repo owned by the user. These can be updated from a source git repo, edited and committed back to git repo. |
Dataset |
Contains folders for each Dataset Repo owned by the user. Each Dataset folder contains subdirectories for each version with the dataset files for the version. |
Model |
Contains folders for each Model Repo owned by the user. Each Model directory contains subdirectories for each version with the model files for the version. |
Notebook |
Contains metadata for user IDE instances |
Training |
Contains metadata for user Training Run instances |
Preprocessing |
Contains metadata for user Preprocessing Run instances |
Inference |
Contains metadata for user Inference instances |
Amazon S3
DKube has native support for Amazon S3. In order to use this within DKube, a Repo must first be created. This is desribed at Add a Dataset
This section describes how to access the data and integrate it into your program. The mount path for the S3 Dataset repo contains the config.json & credentials files.
config.json
{
  "Bucket": "<bucket name>",
  "Prefix": "<prefix>",
  "Endpoint": "<endpoint>"
}
credentials
[default]
aws_access_key_id = xxxxxxx
aws_secret_access_key = xxxxxx
In addition, the path /etc/dkube/.aws contains the metadata and credentials for all of the S3 Datasets owned by the user.
/etc/dkube/.aws/config
[default]
bucket = <bucket name 1>
prefix = <prefix 1>
[dataset-2]
bucket = <bucket name 2>
prefix = <prefix 2>
[dataset-3]
bucket = <bucket name 3>
prefix = <prefix 3>
/etc/dkube/.aws/credentials
[default]
aws_access_key_id = xxxxxxx
aws_secret_access_key = xxxxxxxxx
[dataset-2]
aws_access_key_id = xxxxxxx
aws_secret_access_key = xxxxxxxxx
[dataset-3]
aws_access_key_id = xxxxxxx
aws_secret_access_key = xxxxxxxxx
Amazon Redshift
DKube has native support for Amazon Redshift. In order to use Redshift within DKube, a Repo must first be created. This is described at Add a Dataset
This section describes how to access the data and integrate it into your program. Redshift-specific environment variables are listed at Redshift Variables Redshift can be accessed with or without an API server.
Redshift Access Configuration
Redshift Access with an API Server
In order to configure the API server to fetch the metadata, a kubernetes config map is configured with the following information:
Variable |
Description |
|---|---|
TOKEN |
Security token for the API server |
ENDPOINT |
url for the API server |
DKube fetches the list of databases available and their associated configuration information, such as endpoints and availability region. Additionally, DKube fetches the schemas of the databases from the API server.
Redshift Access without an API Server
By default, DKube will use the following query to fetch the redshift schemas and show them as versions in DKube UI when creating a Dataset.
Accessing the Redshift Data from the Program
Redshift data can be accessed from any Notebook or Run.
The metadata to access the Redshift data for the current job is provided from the Mount Path specified when the Job is created.
redshift.json
{
  "rs_name": "<name>",
  "rs_endpoint": "<endpoint>",
  "rs_database": "<database-name>",
  "rs_db_schema": "<schema-name>",
  "rs_user": "<user-name>"
}
Metadata for all of the selected Redshift datasets for the User is available at /etc/dkube/redshift.json for the Job.
[
   {
     "rs_name": "<name 1>",
     "rs_endpoint": "<endpoint 1>",
     "rs_database": "database-name 1>",
     "rs_db_schema": "<schema-name 1>",
     "rs_user": "<user 1>"
   },
   {
     "rs_name": "<name 2>",
     "rs_endpoint": "<endpoint 2>",
     "rs_database": "database-name 2",
     "rs_db_schema": "<schema-name 2>",
     "rs_user": "<user 2>"
   },
]
Redshift Password
The password for the Redshift data is stored encrypted within DKube. The code segment below can be used to retrieve the information without encryption.
This will return the datasets in the following format:
Mount Path
The mount path provides a way for the code to access the repositories. This section describes the steps needed to enable this access.
Before accessing a dataset, featureset, or model from the code, it needs to be created within DKube, as described at Add a Dataset and Add a Model
This will enable DKube to access the resource. The following image shows a Dataset detail screen for a GitHub dataset that has been uploaded to the DKube storage. It shows the actual folder where the dataset resides.
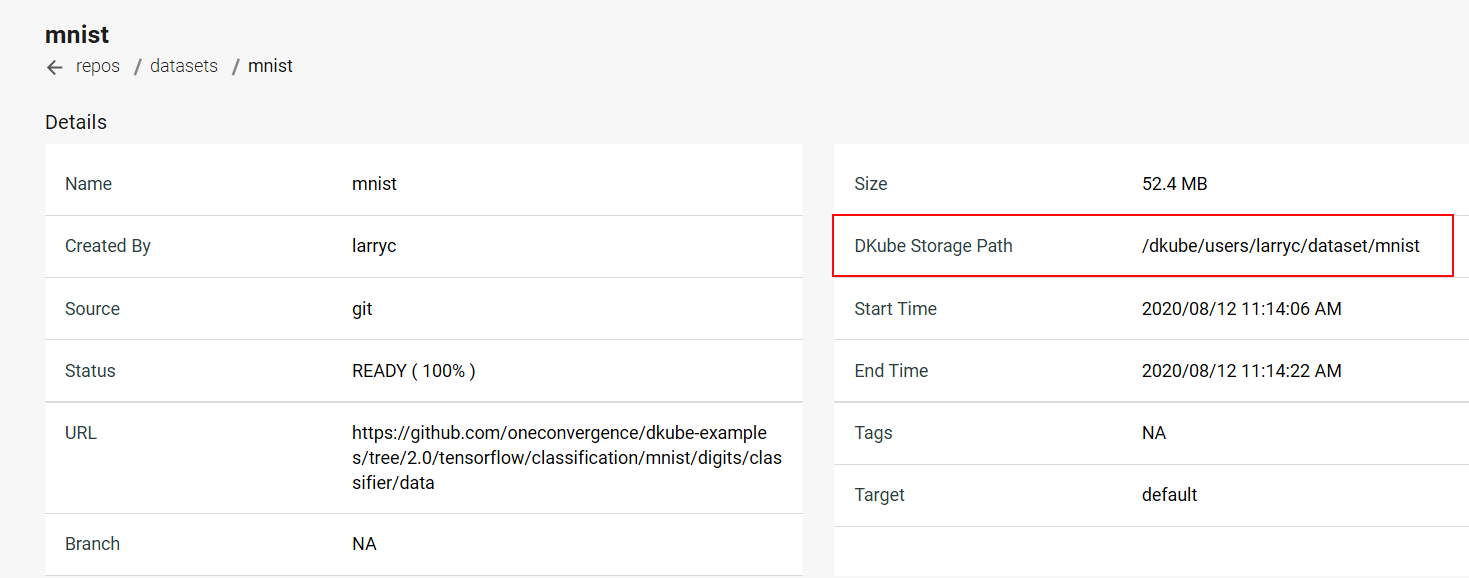
DKube allows the code to access the Dataset, FeatureSet, or Model without needing to know the exact folder structure through the mount path. When creating an IDE or Run, the mount path field should be filled in to correspond to the code.
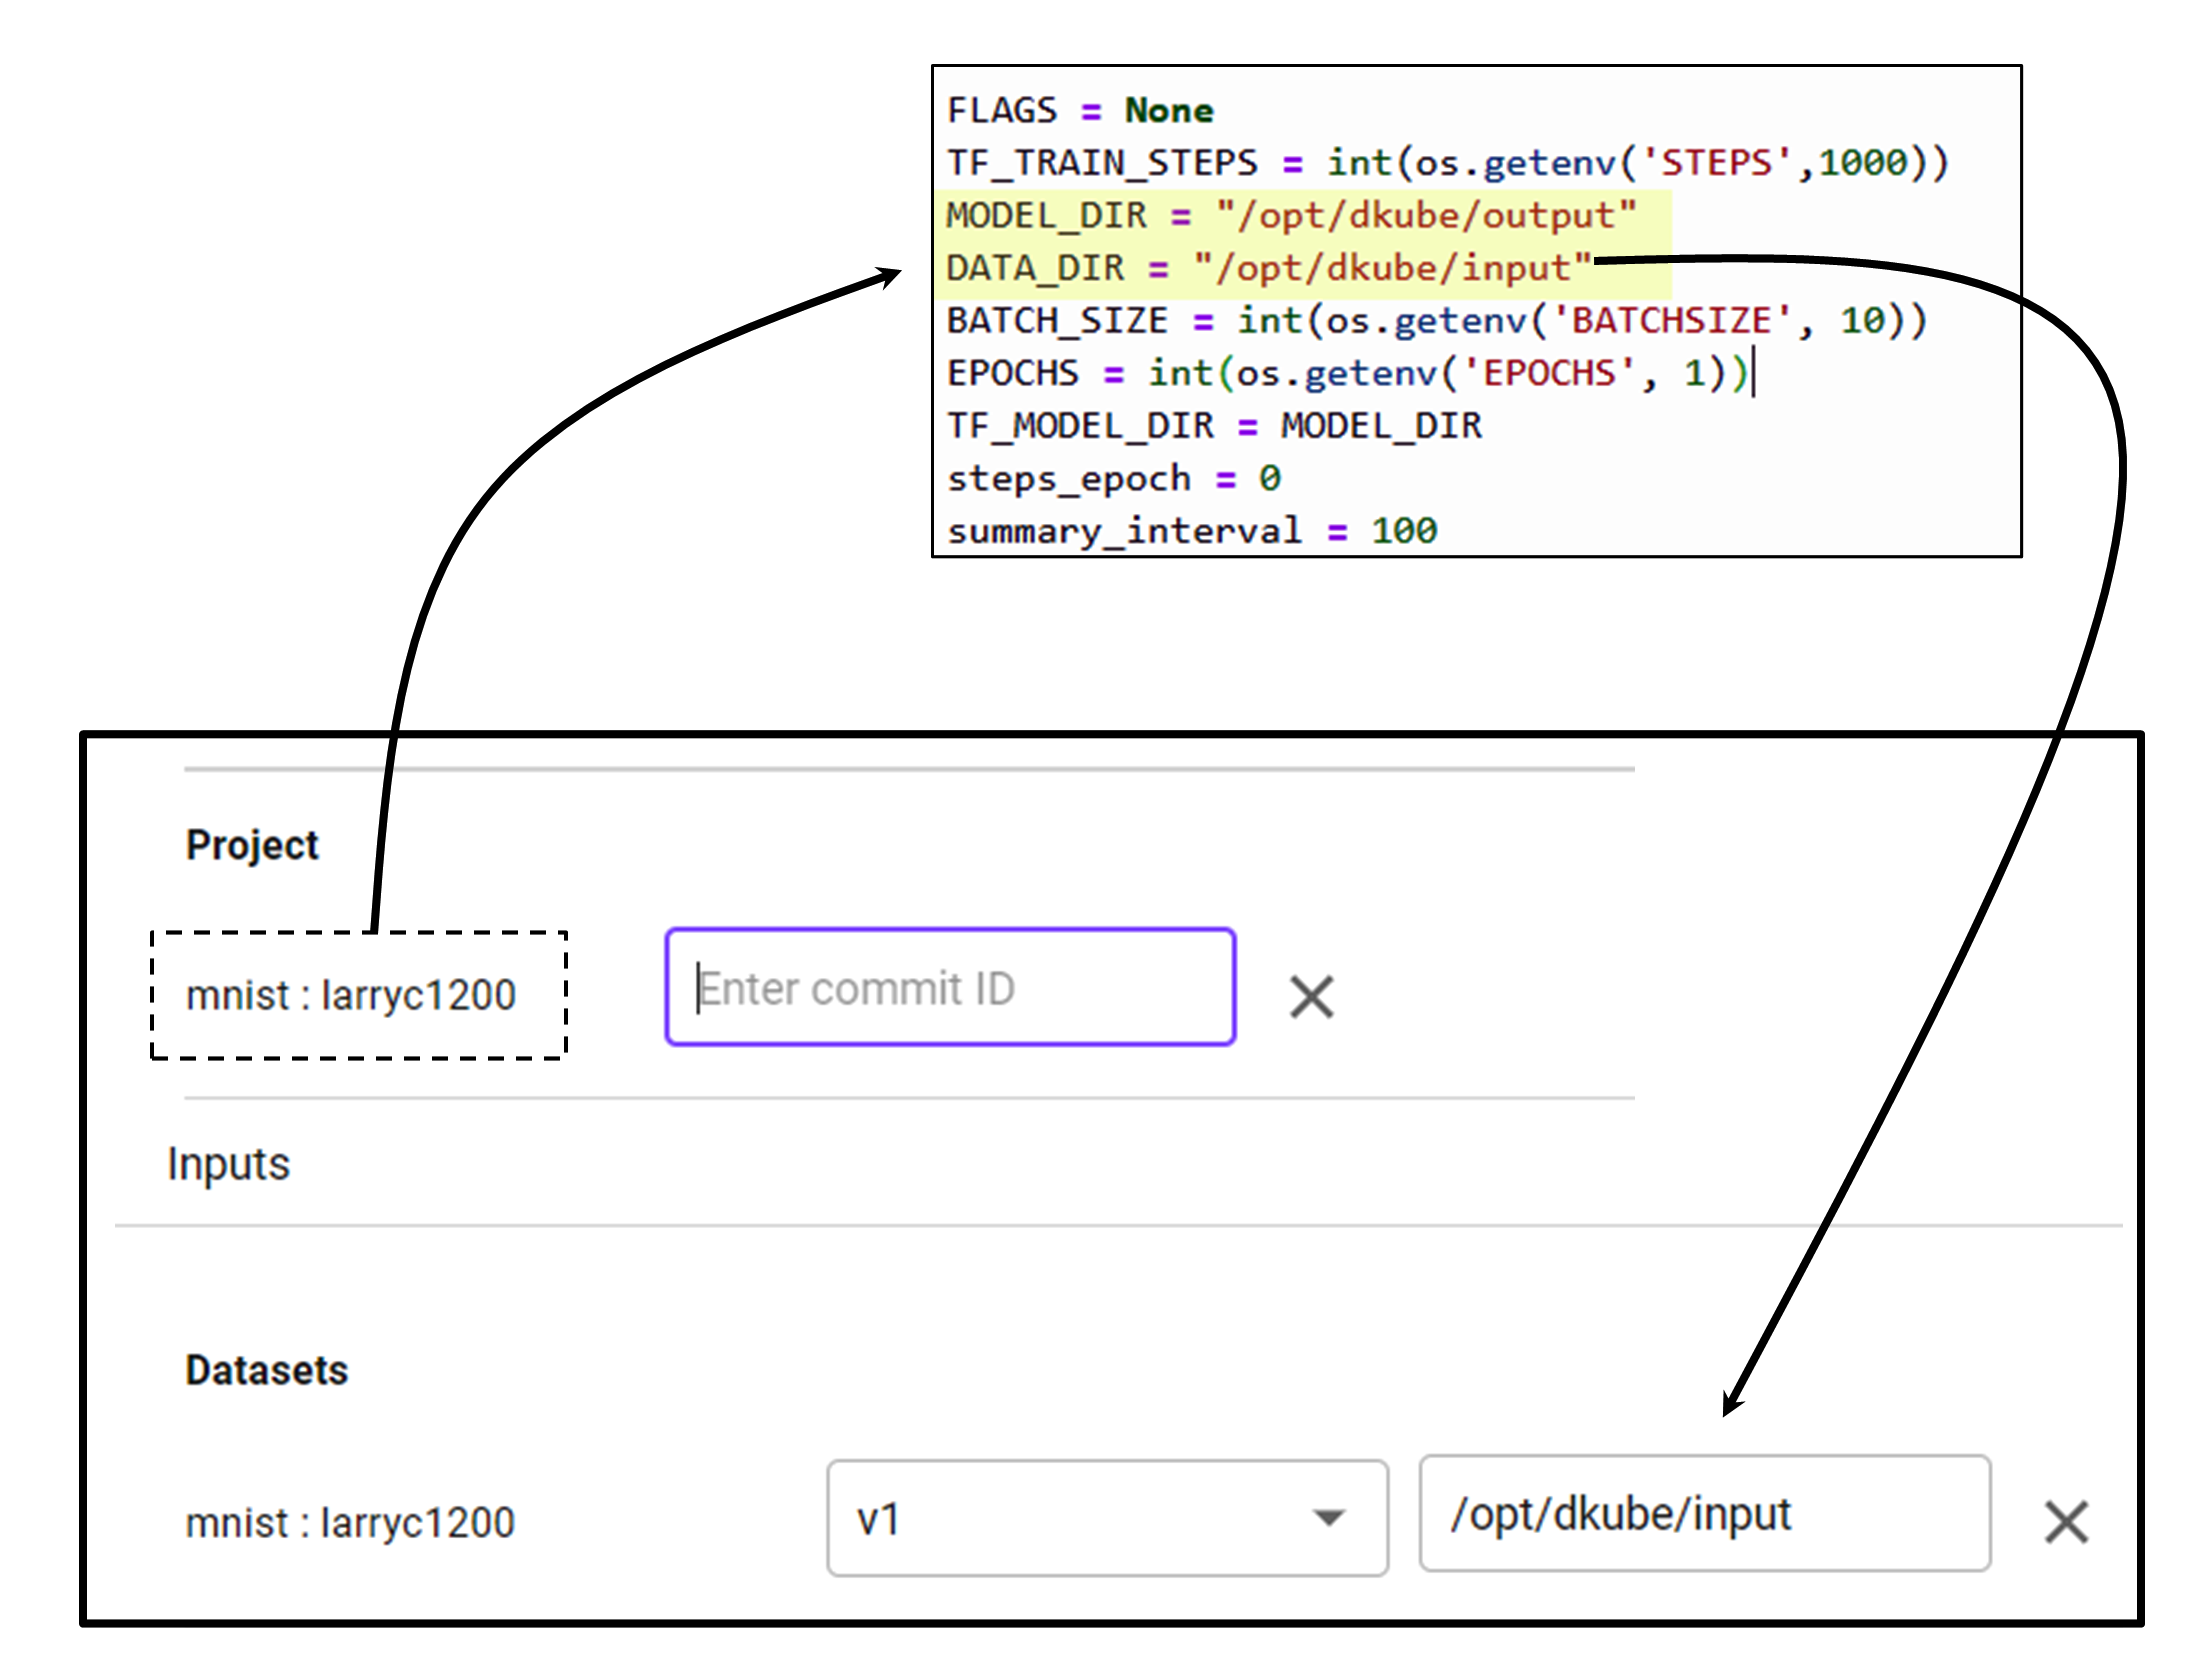
Environment Variables
This section describes the environment variables that allow the program code to access DKube-specific information. These are accessed from the program code through calls such as:
EPOCHS = int(os.environ.get(‘EPOCHS’, 5))
Note
The variables and mount paths are available in the file /etc/dkube/config.json
General Variables
Name |
Description |
|---|---|
DKUBE_URL |
API Server REST endpoint |
DKUBE_USER_LOGIN_NAME |
Login user name |
DKUBE_USER_ACCESS_TOKEN |
JWT token for DKube access |
DKUBE_JOB_CONFIG_FILE |
Configuration file specified at Job creation Configuration Screen |
DKUBE_USER_STORE |
Mount path for user-owned resources |
DKUBE_DATA_BASE_PATH |
Mount path for resources configured for an IDE/Run |
DKUBE_NB_ARGS |
Jupyterlab command line arguments containing auth token, base url and home dir, used in entrypoint for Jupyterlab |
KF_PIPELINES_ENDPOINT |
REST API endpoint for pipelines to authenticate pipeline requests. If not set, pipelines are created without authentication |
DKUBE_JOB_CLASS |
Type of Job (training, preprocessing, custom, notebook, rstudio, inference, tensorboard) |
DKUBE_JOB_ID |
Unique Job ID |
DKUBE_JOB_UUID |
Unique Job UUID |
DKUBE_TENSORBOARD_DIR |
Folder for TensorBoard event files |
Variables Passed to Jobs
The user can provide program variables when creating an IDE or Run, as described at Configuration Screen
These variables are available to the program based on the variable name. Some examples of these are shown here.
Name |
Description |
|---|---|
STEPS |
Number of training steps |
BATCHSIZE |
Batchsize for training |
EPOCHS |
Number of training epochs |
Repo Variables
Name |
Description |
|---|---|
S3 |
|
S3_BUCKET |
Storage bucket |
S3_ENDPOINT |
URL of server |
S3_VERIFY_SSL |
Verify SSL in S3 Bucket |
S3_REQUEST_TIMEOUT_MSEC |
Request timeout for Tensorflow to storage connection in milliseconds |
S3_CONNECT_TIMEOUT_MSEC |
Connection timeout for Tensorflow to storage connection in milliseconds |
S3_USE_HTTPS |
Use https (1) or http (0) |
AWS |
|
AWS_ACCESS_KEY_ID |
Access key |
AWS_SECRET_ACCESS_KEY |
Secret key |
Redshift Variables
Name |
Description |
|---|---|
DKUBE_DATASET_REDSHIFT_CONFIG |
Redshift dataset metadata for user owned Redshift datasets |
DKUBE_DATASET_REDSHIFT_DB_SCHEMA |
Schema |
DKUBE_DATASET_REDSHIFT_ENDPOINT |
Dataset url |
DKUBE_DATASET_REDSHIFT_DATABASE |
Database name |
DKUBE_DATASET_NAME |
Dataset name |
DKUBE_DATASET_REDSHIFT_USER |
User name |
DKUBE_DATASET_REDSHIFT_CERT |
SSL Certificate |
Hyperparameter Tuning Variables
Name |
Description |
|---|---|
DKUBE_JOB_HP_TUNING_INFO_FILE |
Configuration file specified when creating a Run |
PARENT_ID |
Unique identifier (uuid) |
OBJECTIVE_METRIC_NAME |
Objective metric |
TRIAL |
Count of trial runs |
DKube SDK
One Convergence provides an SDK to allow direct access to DKube actions. In order to make use of this, the SDK needs to be called at the start on the code. An SDK guide is available at DKube SDK
Writing Code for Metric Logging
Metric & Artifact logging within DKube are handled through MLFlow APIs. The APIs that are supported are defined at:
The following steps are required to save a model and its associated metrics and artifacts:
Create and/or set an MLFlow Experiment
Start an MLFlow Run
Perform the Model training within the MLFlow Run
Log the pertinent metrics & artifacts from within that Run
This section provides some code segments that show how to log metrics using Python and Tensorflow/Keras. Other training frameworks, such as scikit-learn, will differ in the details.
Import MLFlow Module
Create & Set MLFlow Experiment
MLFlow Runs execute in an Experiment. The Experiment first needs to be created, then the Experiment needs to be set as the current one. In addition, the output folder for the MLFlow data needs to be created.
Define Callback Function
The metric logging happens as part of the training process by using a callback function that will log the metric after each epoch.
Note
The callback is required for Tensorflow/Keras. Scikit-learn does not have this requirement.
Train Model & Save Model Data
The model, metrics, and artifacts are saved as part of the MLFlow Run.
loggingCallback is called for each epoch to log the metrics
After the training is complete, the model is saved with model.save using the Mount Path /model
The Mount Path is set during and IDE or Run as described at Mount Path
Standard artifacts are provided for the Run in the menu screen by selecting the Run name and the Artifacts tab. Additional artifacts can be saved by using the mlflow.log_artifacts function.
Note
The callback is required for Tensorflow/Keras. With scikit-learn you can use the mlflow.log_metric function directly in the training run.
Writing Code for Katib
Katib is a Kubeflow framework that executes hyperparameter optimization during training. More details on this can be found at Introduction to Katib
A description of how to use Katib within DKube is available at Hyperparameters
In order to use Katib, the code must be written to accept the tuning file and to output the metrics in the right format. In this example:
Epochs & Learning Rater will be varied
Training Loss will be minimized
Read the Katib Tuning Input
The Katib tuning file describes the tuning objective and the hyperparameters that will be varied to determine which combination best achieves that objective. This information is saved by parsing the input arguments. The argparse module is used for this function.
The expected hyperparameters are read into arg variables
Log the Output Metrics
Katib runs the number of trials set by the tuning file, and after each trial it analyzes the output metric. The metric is read from stdout. The MLFlow logging code was shown in a previous section. In order to enable Katib, the metric also needs to be output after each completed trial.
Important
During the model.fit the option verbose=False must be set in order to get clean metric outputs that Katib can read
Writing Code for TensorBoard
In order to make use of TensorBoard within DKube, the code needs to be instrumented so that the event files are written to the right folder.
TensorBoard in a Notebook
When running your code within a Notebook, the TensorBoard UI expects the event logs to be in the folder defined by the environmental variable DKUBE_TENSORBOARD_DIR.
Write the Event Files
The TensorBoard event files are written using a callback in the training function. An example of the code to log the event files would look like this:
TensorBoard during a Training Run
For a Training Run, the TensorBoard event logs can be in one of 2 places:
Folder identified by DKUBE_TENSORBOARD_DIR
Folder defined within the Model directory when the Run is created
Write the Event Files
The TensorBoard event files are written using a callback in the training function. An example of the code to log the event files would look like this:
Kubeflow Pipelines Template
Kubeflow Pipelines provide a powerful mechanism to automate your workflow. DKube supports this capability natively, as described at Kubeflow Pipelines
One Convergence offers templates and examples to make pipeline creation convenient.

One Convergence provides a set of component definition files for the necessary functions needed to create a pipeline within DKube (item 1). The files include:
A description of the component
A list of inputs and outputs that the component accepts
Metadata that allow the component to be run within DKube as a pod
They are located in the folder /mnt/dkube/pipeline/components from within a JupyterLab notebook.
They can also be accessed from the GitHub location DKube Pipeline Components
These components are called by the DSL pipeline description (item 2), and allow the developer to focus on the specific inputs and outputs required by the Job rather than the details of how those fields get translated at the lower levels. The DSL compliler will convert the DSL into a pipeline YAML file, which can be passed to Kubeflow to run.
An example of using the templates to create a pipeline is found at DKube Training
The file pipeline.ipynb uses the template to create a pipeline within DKube.
Custom Container Images
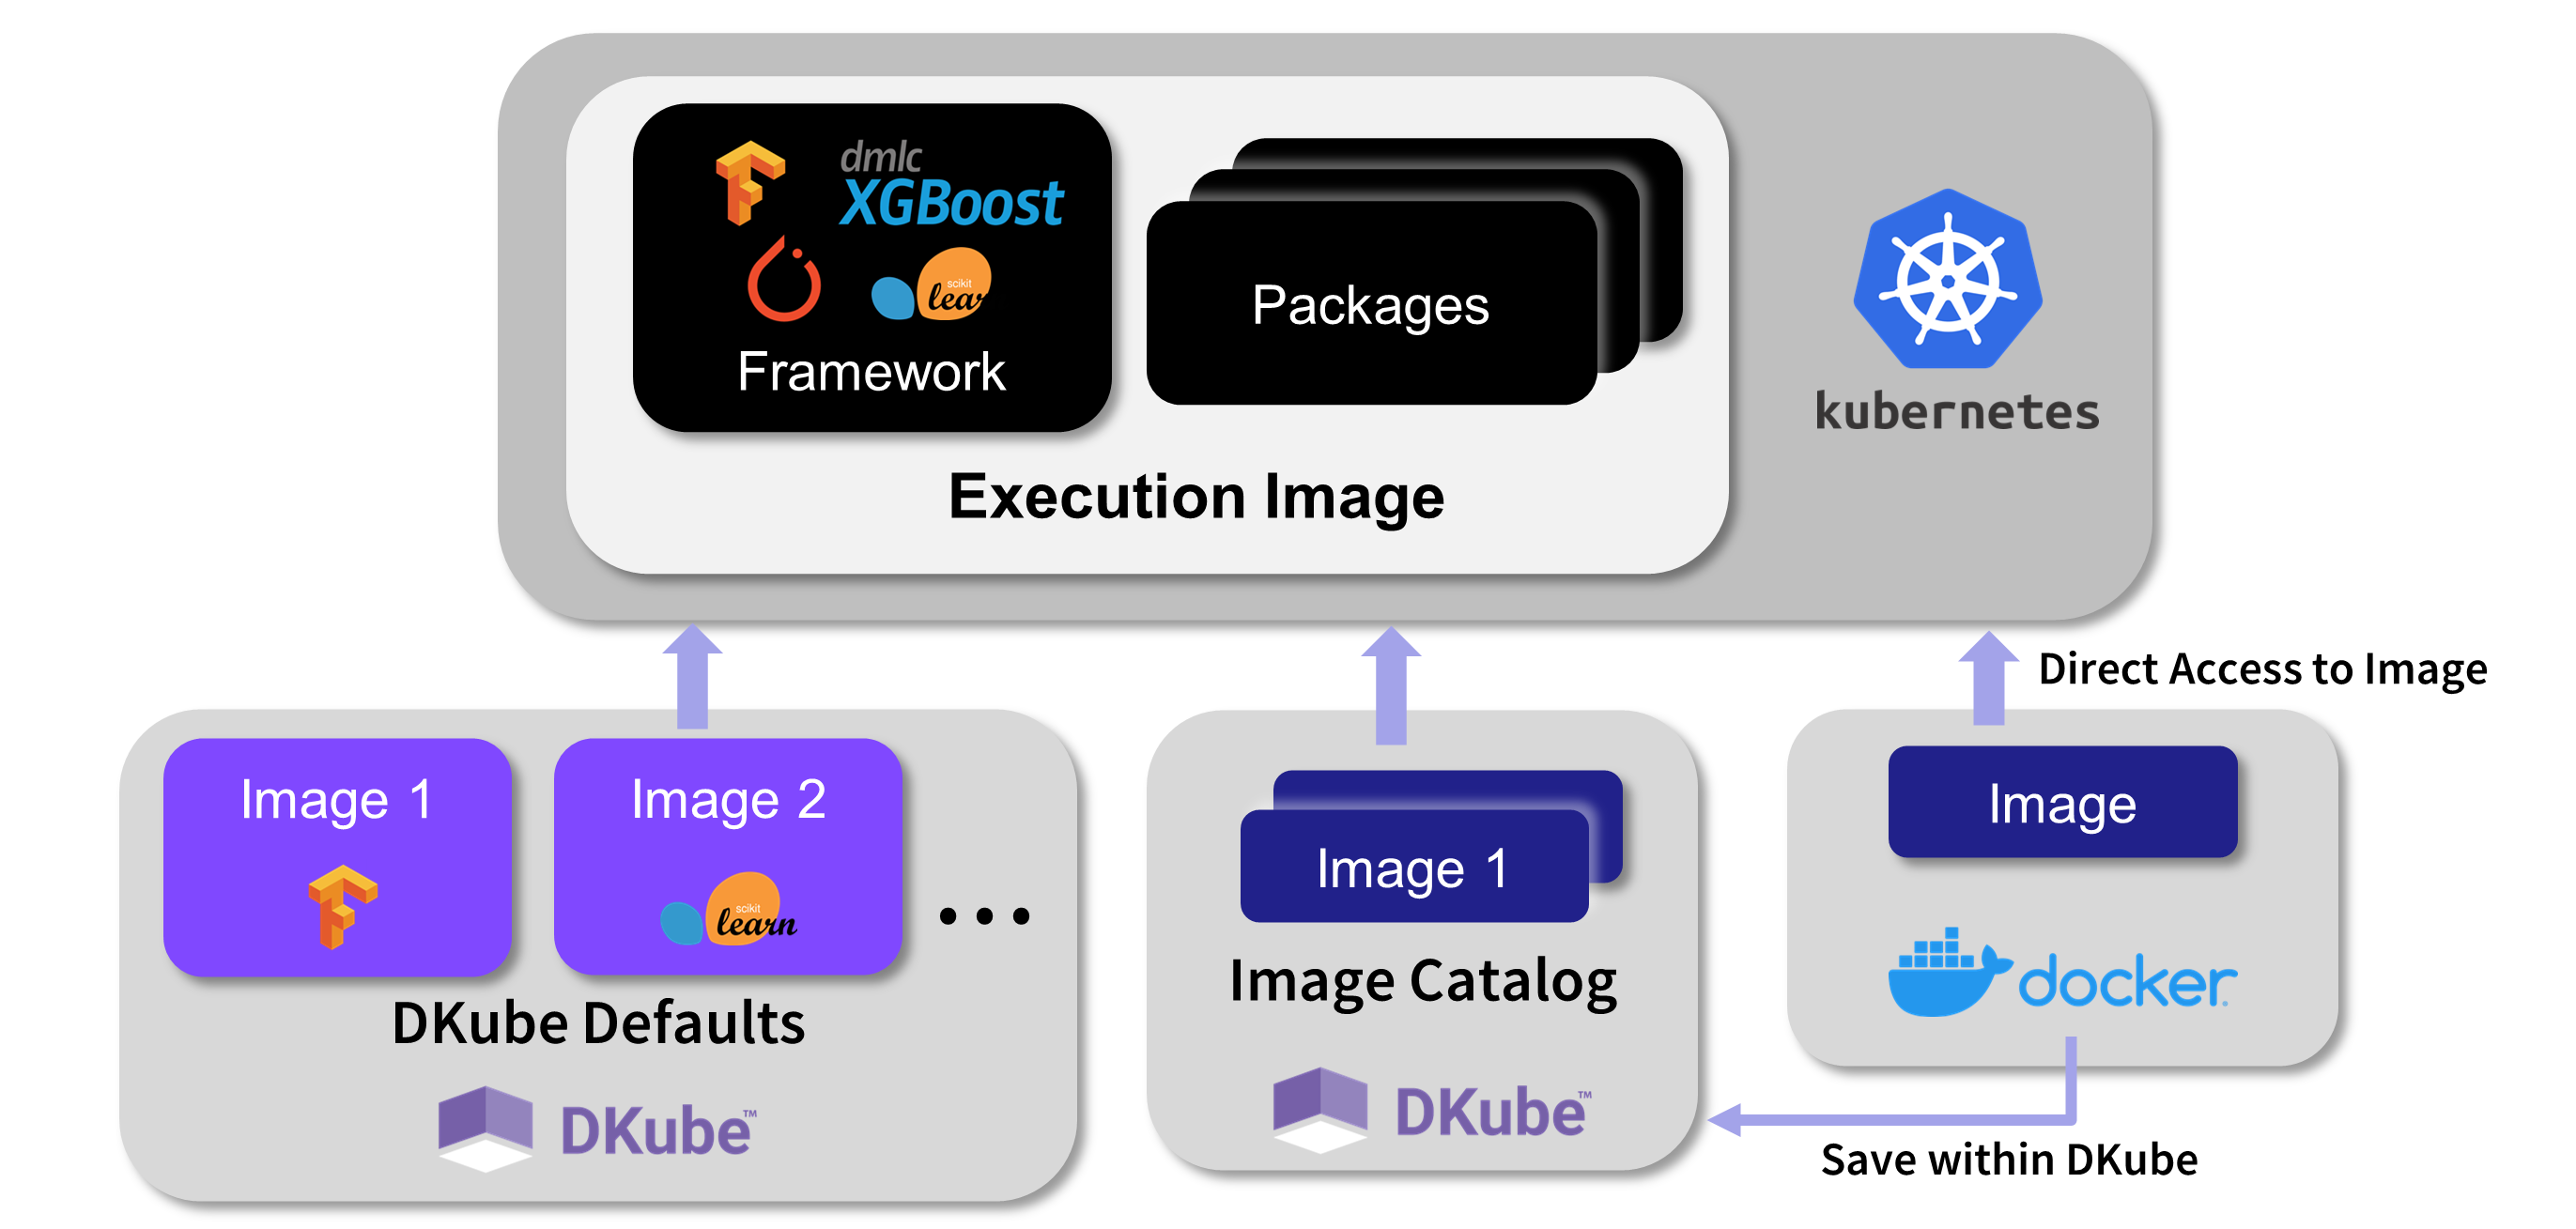
DKube jobs run within container images containing framework and preloaded packages. The image is selected when the Job is created. The image can be from several sources:
DKube provides standard images based on the framework, version, and environment
An image can be manually created, as explained in this section, and stored within an Image Catalog, described at Images
An image can be used from a repo, either directly or after being stored in the Image Catalog
If the standard DKube Docker image does not provide the packages that are necessary for your code to execute, you can create a custom Docker image and use this for IDEs and Runs. There are several different ways that DKube enables the creation and use of custom images.
Manual Image Creation
This section describes the process to build a custom Docker image manually.
Getting the Base Image
In order to create a custom image for DKube, you can start with the standard DKube image for the framework and version, and add the packages that you need. The standard images are available from the Image dropdown field during IDE & Run creation.
Adding Your Packages
In order to add your packages to the standard DKube image, you create a Dockerfile with the packages included. The Dockerfile commands are:
Building the Docker Image
The new image can be built with the following command:
Pushing the Image to Docker Hub
In order to push the image, login to Docker Hub and run the following command:
Using the Custom Image within DKube
When starting a Run or IDE, select a Custom Container and use the name of the image that was saved in the previous step. The form of the image will be:
JupyterLab Custom Images
When creating a custom image for use in a JupyterLab notebook within DKube, you must include the steps that provide the jovyan user sudo permissions. This allows that user to install system packages within the notebook.
FROM jupyter/base-notebook:latest

ENV DKUBE_NB_ARGS ""
USER root
RUN echo "$NB_USER ALL=(ALL) NOPASSWD:ALL" > /etc/sudoers.d/notebook
USER jovyan
CMD ["sh", "-c", "jupyter lab --ip=0.0.0.0 --port=8888 --allow-root $DKUBE_NB_ARGS"]
CI/CD
DKube provides an automated method to:
Build and push images to a Docker registry based on a code change
Execute an automated set of steps through DKube
Basic Setup for CI/CD
In order to make use of the CI/CD feature, certain files need to be created in the Code repo to define the necessary actions.
Setting up the Repository
In order for the CI/CD system to operate, the repository needs to be set up with the files that provide the action instructions. The directory structure should be as follows:
Repository Root
     |
     |--- .dkube-ci.yml
     |
The other folders and files described in this section can be in any folder, since the .dkube-ci.yml file will identify them by their path.
Placement of .dkube-ci.yml
There can be a .dkube-ci.yml file in one, more, or all branches. When a code change is made on a branch, the .dkube-ci.yml for that branch will be used to execute the actions defined for that branch. For CI/CD triggering from the DKube UI, the branch will be specified during the submission.
CI/CD Actions
The CI/CD can be triggered in 2 different ways:
From the DKube Builds screen, as described at Images
From a GitHub Webhook trigger, described in this section
In both cases, the file .dkube-ci.yml is used by the CI/CD system to find the other necessary files to execute the commands. The general format of the .dkube-ci.yml file is as follows:
The following types of actions are supported by the CI/CD mechanism.
Declaration |
Description |
|---|---|
Dockerfile: |
Build and push a Docker image using a Dockerfile |
conda-env: |
Build and push a Docker image using the Conda environment |
docker_envs: |
Register existing Docker images with DKube |
images: |
Build other Docker images |
jobs: |
Add a DKube Jobs template or run Jobs |
components: |
Build a Kubeflow component |
pipelines: |
Compile, Deploy, and Run a Kubeflow pipeline |
Folder Path
The path: declaration can have a hierarchical designation. So, for example, if the file is in the hierarchy folder1/folder2, as referenced from the base repository, the path: declaration would have that hierarchy.
Combining Declarations
The declarations can be combined in any order.
Important
The actions from the declarations are run in parallel, except for the Pipeline step, which waits for the components to be built. For others, such as the Jobs: declaration, the image must already have been built and ready for use.
More details on the syntax of the actions are available at CI/CD Examples
Automated Execution Through GitHub Webhook
The CI/CD actions can be triggered automatically through a GitHub repo commit. The actions described above will be performed based on the .dkube-ci.yml file.
The Webhook is set up through the procedure in this section.
The Webhook is set up from the root level of the repository, within the branch that will be used for commits. Select the Settings tab.
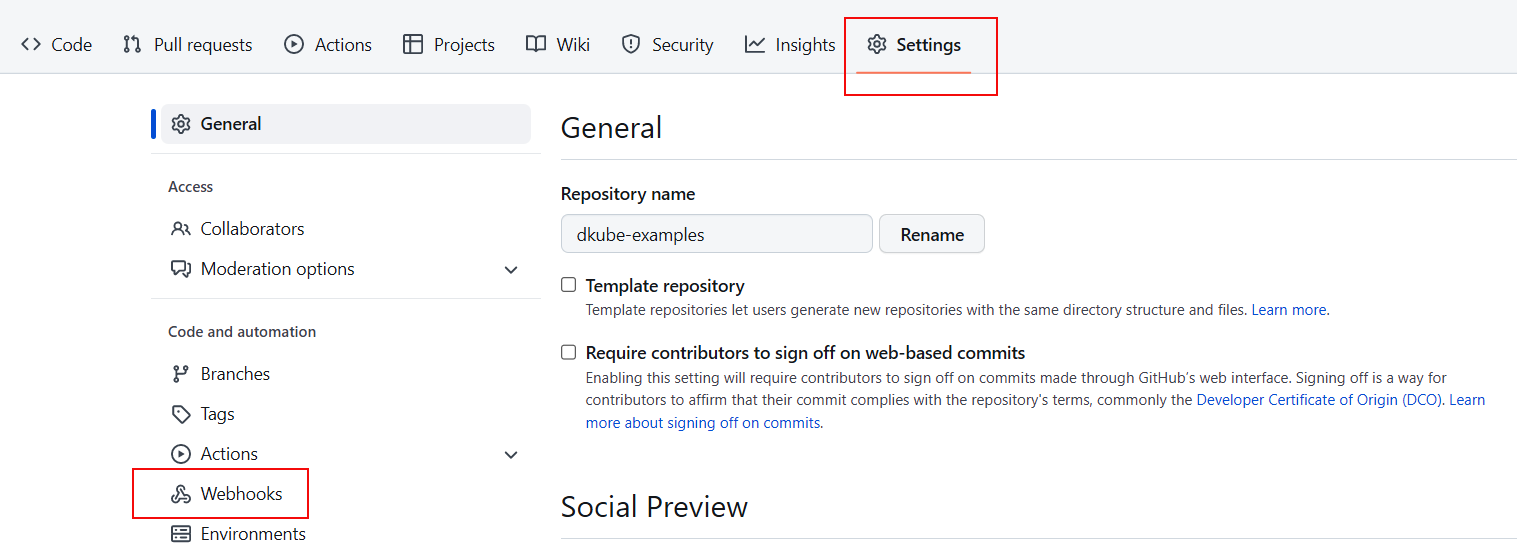
Select the Webhook menu item on the left.
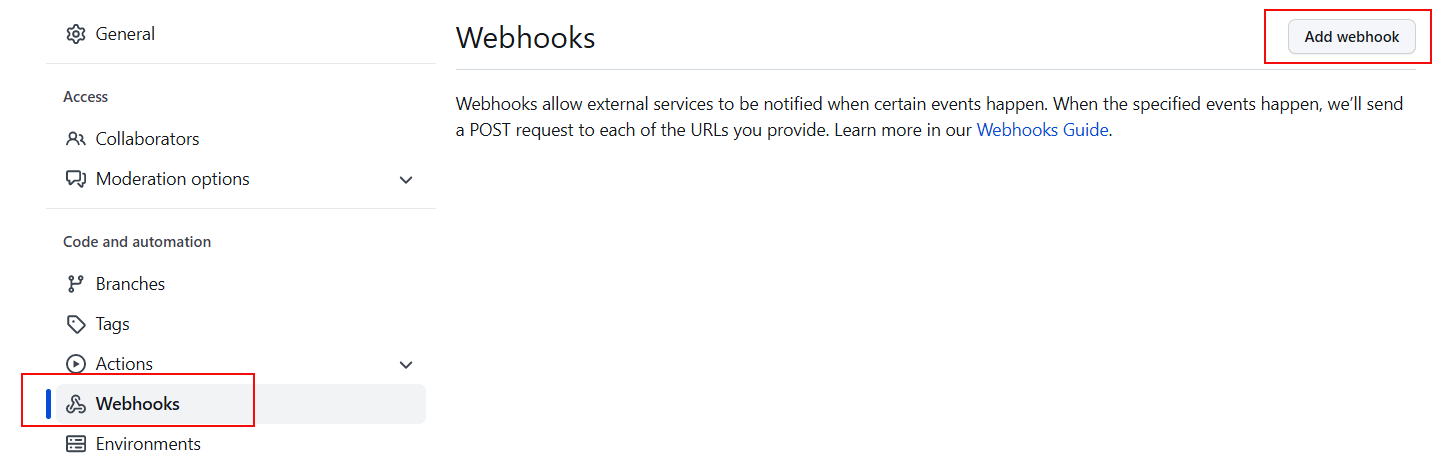
Select the Add webhook button on the top right.
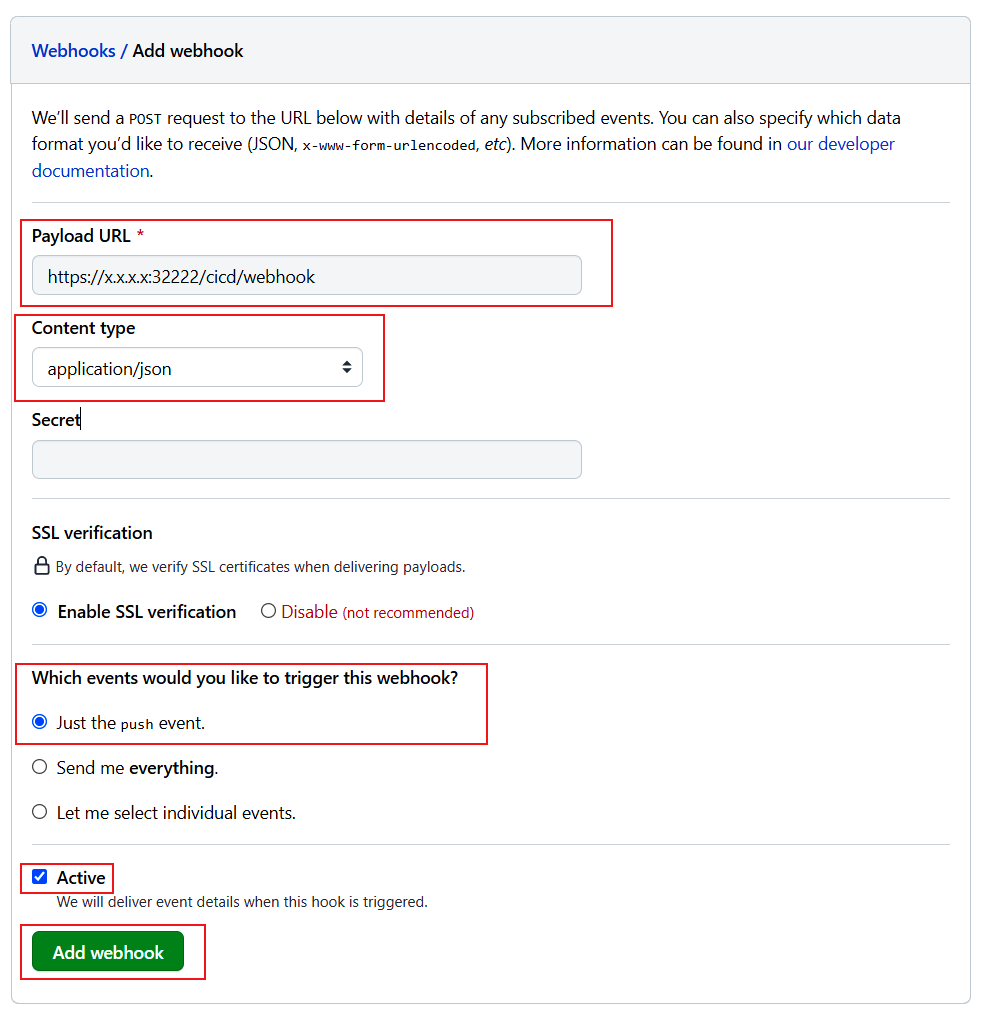
The Webhook fields should be filled out as follows:
Field |
Description |
|---|---|
Payload URL |
URL used to access DKube, with /cicd/webhook at the end |
Content type |
application/json |
Which events… |
Just the push event |
Active |
Check this when ready to enable the trigger |
Important
When the Active checkbox is enabled, every commit to the repo will trigger the CI/CD. Leave this unchecked until you are ready to enable the CI/CD actions.
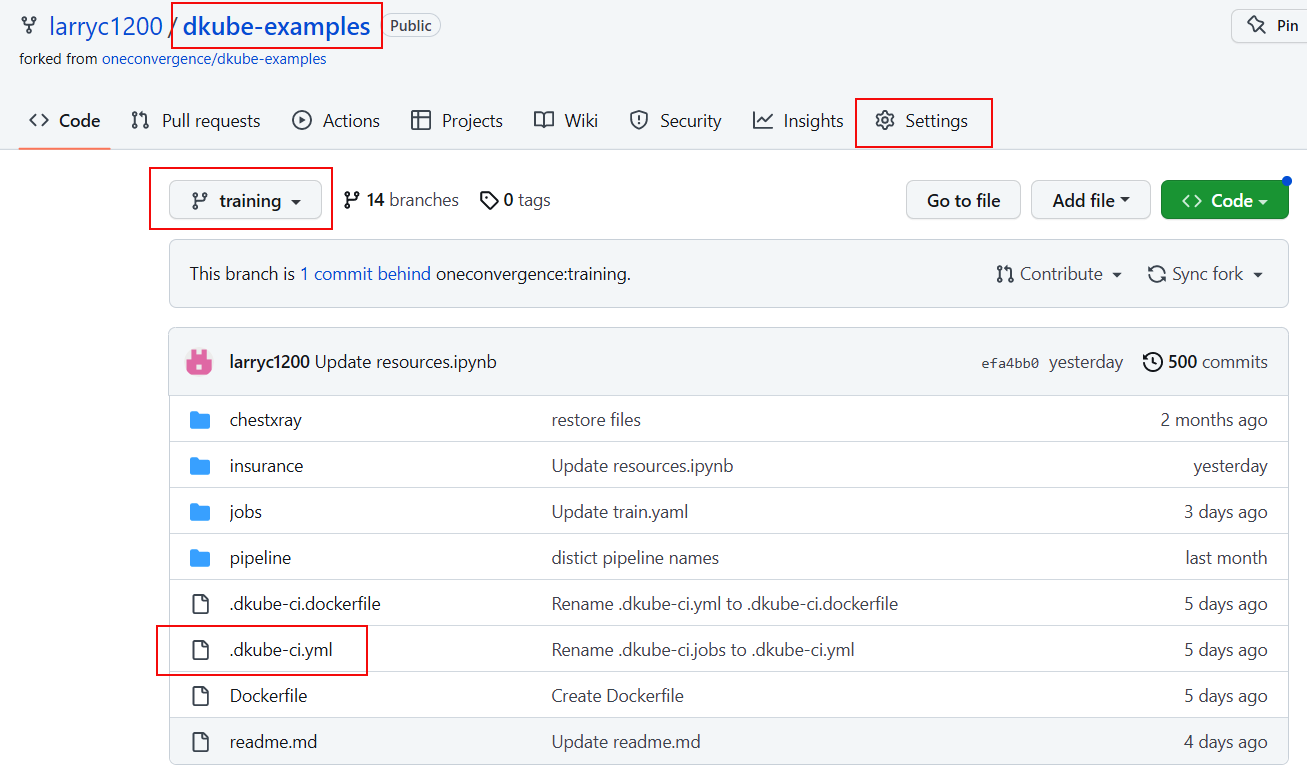
CI/CD Example
This section provides a basic example to demonstrate how to setup and use the CI/CD capability. This example creates and builds a Docker image. The repository that is used for this example is in the following GitHub repo within the training branch:
https://github.com/oneconvergence/dkube-examples/tree/training
Follow the readme instructions to execute the example.
Inference Deployment Requirements
Once the training is complete for a DKube model, it can be deployed on a test or production inference server Model Deployment Workflow
The model can be deployed with or without a Model Serving Transformer
A trained model can be deployed with the default DKube image, or with a custom image that the user can provide as described at Images
Optional Transformer
As described in the section referenced above, a transformer can optionally be included. If the model is deployed with a transformer, the transformer.py file needs to be written with the following prerequisites:
A class should be defined with preprocess and postprocess as member functions
The class will take the kfserving.KFModel as an argument, and initialize the predictor host.
An example is provided here:
The preprocess function will accept a dictionary containing the data to be processed and return the payload
The postprocess function will also accept a dictionary containing the output for the model prediction in a dictionary data structure. The function will return the processed model output.
A main function is required to start. An example of this is:
For more details refer to the sample transformer.py file at Transform.py Example
Note
Currently a transformer component can only be written in Python
Accessing DKube MinIO Server
DKube includes an integrated MinIO server that can be used to supply data to Job executions. For example, the DKube Monitoring examples create synthesized datasets for live data and ground truth and serve them from the DKube MinIO server.
Note
The MinIO server is only available in a full DKube installation
In order to make use of the MinIO server, the access IP and credentials need to be added to a DKube Dataset.
Getting MinIO credentials
The credentials can be obtained from the DKube API server. This is accessed from the DKube access URL in the form:
https://<DKube Access IP>:32222/#/api
This will bring up the DKube API screen.
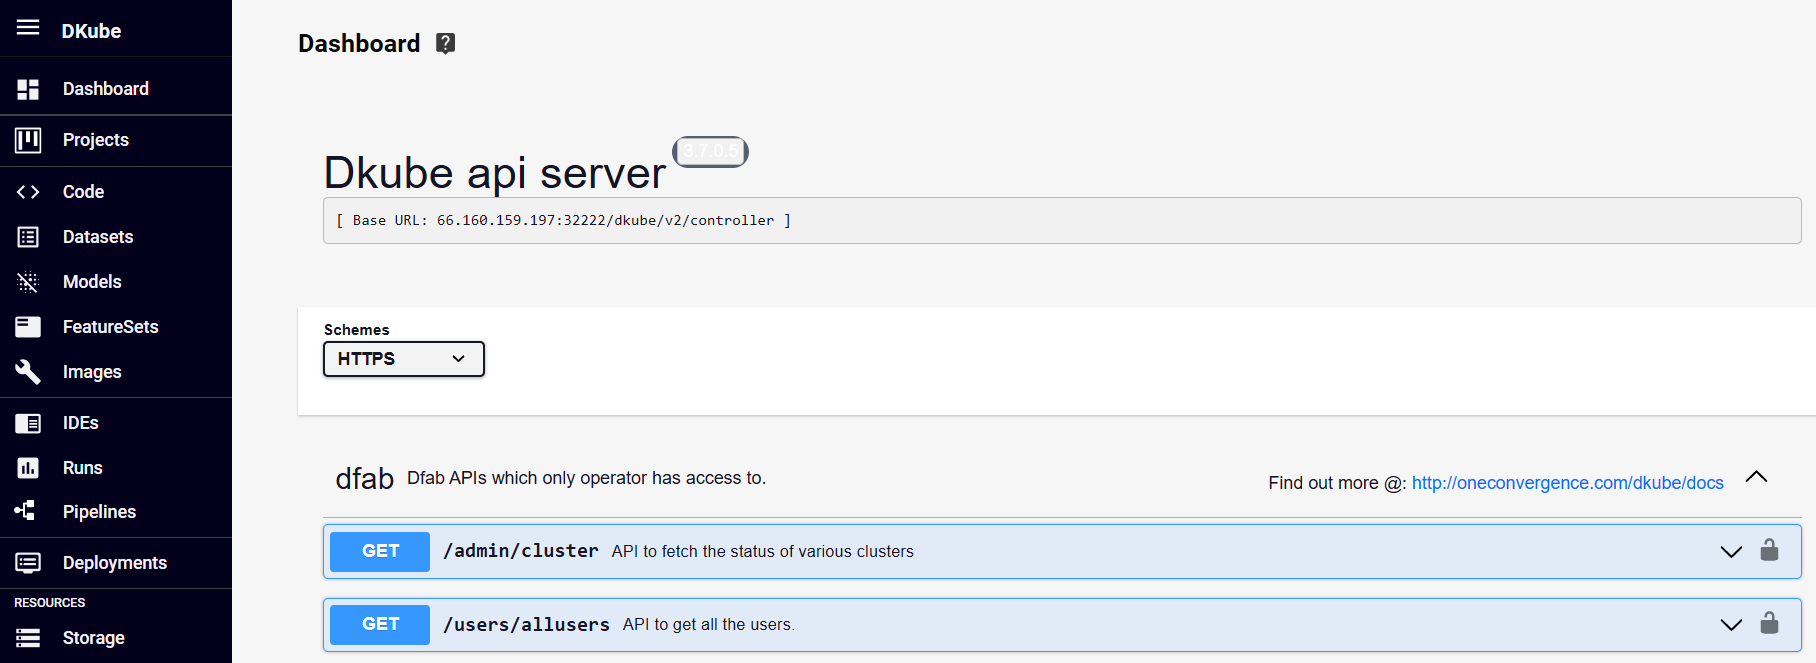
From within that screen, search for logstore
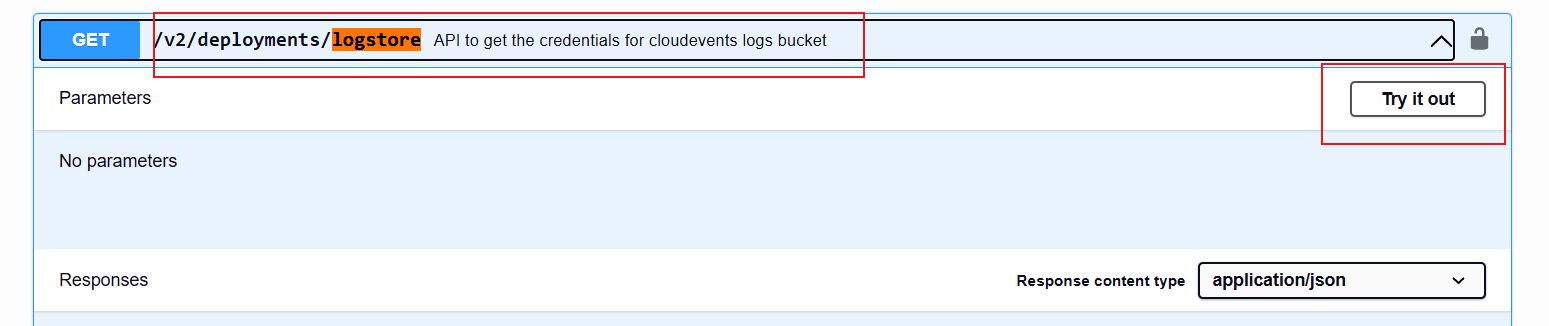
Expand the logstore entry
Select Try it Out
Execute

This will execute the curl command and provide a response that includes the AccessKey and AccessKeyId
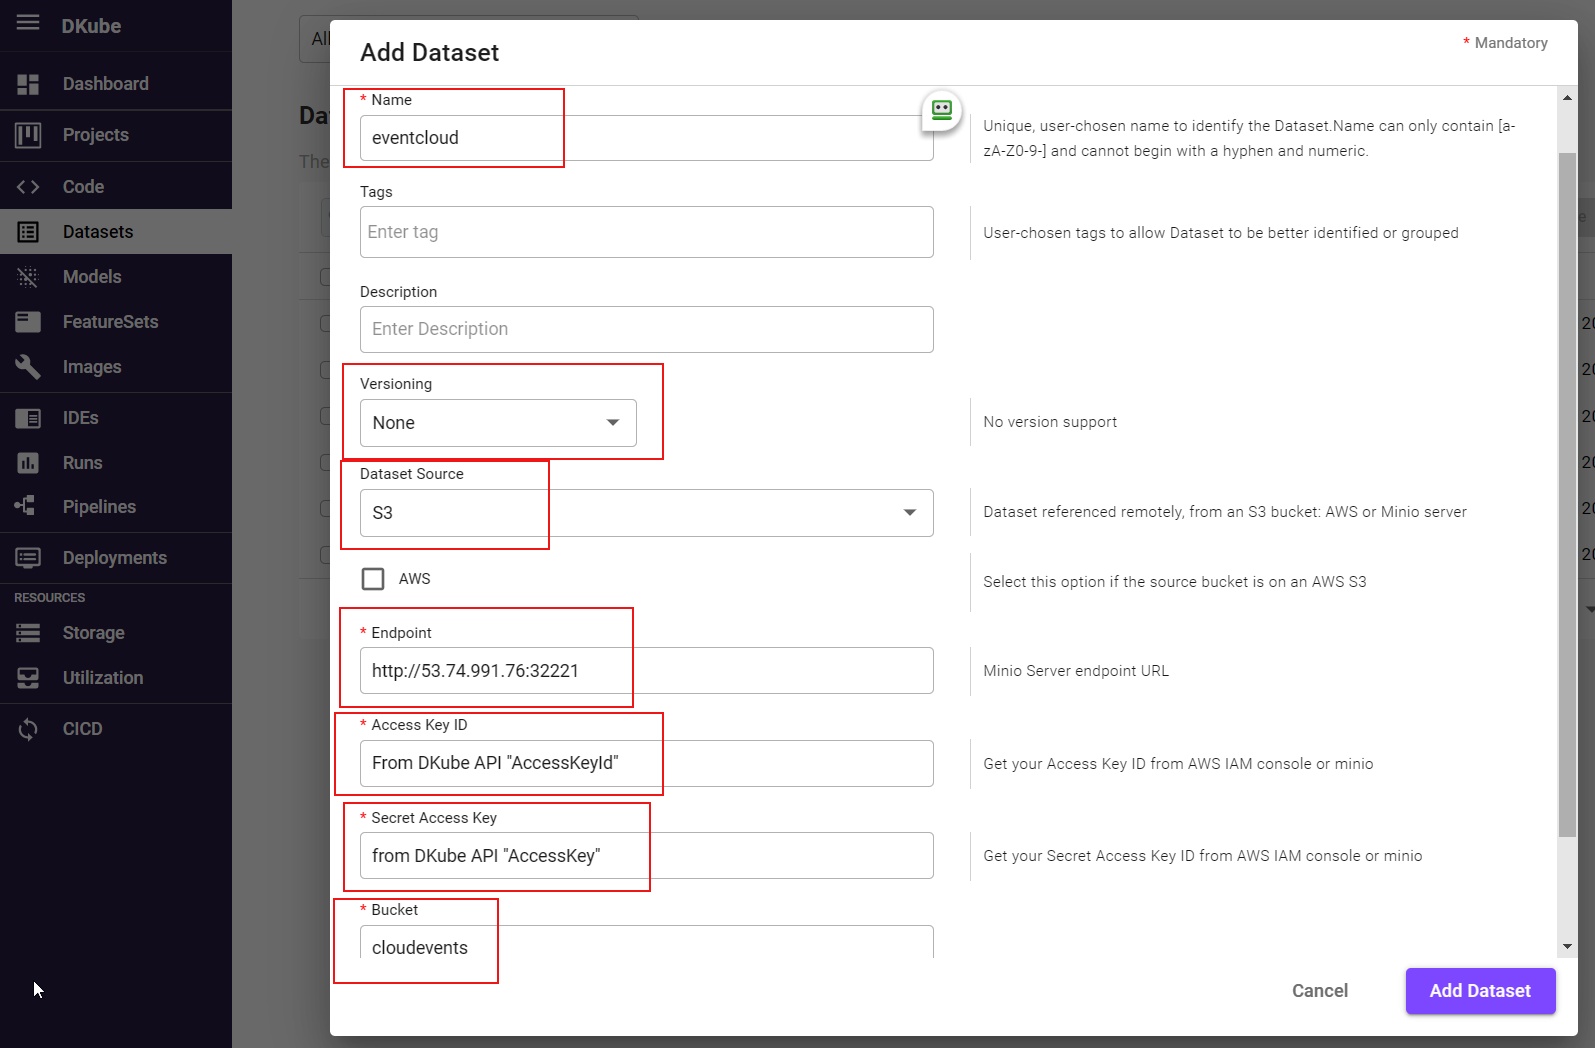
Creating Dataset Repo
The credentials will be used to create a Dataset repo within DKube. Create a Dataset repo by selecting the menu on the left and selecting
Fill in the fields as follows, then
Field |
Description |
|---|---|
Name |
User-selected name for the Dataset |
Versioning |
None |
Dataset Source |
S3 |
Endpoint |
DKube access URL of form http://<DKube IP Address>:32221 |
Access Key ID |
AccessKeyId from previous step |
Secret Access Key |
AccessKey from previous step |
Bucket |
cloudevents |
Note
The Endpoint field needs to be http (not https), and the port is 32221
TensorFlow Deployment
DKube’s TensorFlow serving image uses TensorFlow Serving to serve models trained using the Tensorflow framework
A TensorFlow trained model should be saved in protobuf format. Other file formats are not supported by Tensorflow serving. Tensorflow’s model.save function can be used to save the trained model in the protobuf format.
The model should be saved under a version folder (such as [mount_path}/1]). The save-path follows a convention used by TensorFlow Serving where the last path component (/1 in the example) is a version number for your model. This allows tools like TensorFlow Serving to determine the relative freshness of the model.
Refer to TensorFlow Saved Model for more details about saving the model
PyTorch Deployment
The DKube PyTorch serving image uses the standard torch.load and the predict methods to load and serve models
A PyTorch trained model should be saved with a model.pt file. The function torch.save can be used to save a PyTorch model into the .pt format. The file name should be model.pt only.
A net.py is also required to be saved within the same model directory. This defines the model class. An example of this can be found at Net.py Example
The net.py should have a class name Net, and there should not be any other .py file in the model save directory. If there are other files, the serving execution will provide an exception.
Refer to Saving and Loading Models for Inference for more details about saving the model
SKLearn Deployment
The Dkube Sklearn serving image uses joblib to the load model and predict.
A scikit-learn model should be saved in joblib format and the file name should be model.joblib. Other formats are currently not supported.
Refer to Model Persistence for more details about saving the model
Custom Deployment
In a custom deployment the model can be saved in any user-specific format
A custom deployment will also require a custom serving image which would be user-defined