SecureLLM
Overview
DKubeX SecureLLM is a secure interface solution which facilitates observability and monitoring between AI app users and LLMs in use. For all requests from the AI applications, SecureLLM proxies these LLM calls and records both the request and response transactions.
Features
- The main features of SecureLLM are as follows-
Proxying all LLM calls, providing better security.
Monitoring usage by applications, users and models across interactions with multiple LLMs, helping in managing cost escalation and performance issues.
Providing an user-friendly dashboard for monitoring visualization.
Distribute custom application keys for each use case with fine grain controls per-app to manage usage and limits.
Install, Upgrade and Uninstall SecureLLM
Note
The following instructions are for installing SecureLLM on a RKE2 cluster. In case of an EKS cluster you can install SecureLLM by using the Terraform scripts during DKubeX installation. For more information regarding this, please visit Installing DKubeX on EKS Cluster using Terraform.
Installing SecureLLM
Prerequisites
You need to get the NFS server ip for your setup for installing SecureLLM.
On your DKubeX backend terminal, run the following command to get the IP for NFS server of your setup.
kubectl get pv d3x-data -n d3x -o yaml | grep -i server
Installation
Update the dkubex-helm repository by running this command on your DKubeX backend terminal.
helm repo update dkubex-helmReplace the parts enclosed with $ with the appropriate details in the following helm install command and execute it to install securellm. The replacable parts are explained below.
$release-name$: Provide any name
$nfsip$: NFS server IP
$nfspath$: “/securellm/postgres”
Note
Using this is safe, but actually you can put anything unique that has not been used before, and especially during DKubeX installation. if unique not used, it deletes whatever was left from before in that path.
$adminid$: Create and put an unique admin ID which will be required to log into SecureLLM. This should be entered in an Email ID format.
$adminpasswd$: Create and put an unique admin password which will be required to log into SecureLLM.
$crtoken$: token for pulling the images for securellm from docker repository.
$openaikey$: You can provide this if you want a default OpenAI key. Otherwise, just keep a single space between quotes.
helm install $release-name$ dkubex-helm/securellm -n securellm --create-namespace \
--set global.db.internal.nfs.enabled=true \
--set global.db.internal.nfs.server="$nfsip$" \
--set global.db.internal.nfs.path=$nfspath$ \
--set sllmAdminUser="$adminid$" \
--set sllmAdminPassword="$adminpasswd$" \
--set ingress.oauth.enabled=true \
--set ingress.className="d3x" \
--set imageCredentials.username="<docker_registry_username>" \
--set imageCredentials.password="$crtoken$" \
--set global.db.wipedata=true \
--set sllmOpenaiKey="$openaikey$" \
--version 0.6 --wait
helm install dkubex-securellm dkubex-helm/securellm -n securellm --create-namespace \
--set global.db.internal.nfs.enabled=true \
--set global.db.internal.nfs.server="fs-00fc8be8195645gl2.efs.us-west-2.amazonaws.com" \
--set global.db.internal.nfs.path="/securellm/postgres" \
--set sllmAdminUser="admin@dkubex.ai" \
--set sllmAdminPassword="admin@dkubex" \
--set ingress.oauth.enabled=true \
--set ingress.className="d3x" \
--set imageCredentials.username="<docker_registry_username>" \
--set imageCredentials.password="************************************************" \
--set global.db.wipedata=true \
--set sllmOpenaiKey="" \
--version 0.6 --wait
Wait for this process to be completed. This will install SecureLLM on your setup.
Upgrading SecureLLM
To upgrade SecureLLM from an older version to a newer version, use the following steps.
Get the name of the deployed release by running the following command.
helm list -n securellmRun the following command on your system terminal. Replace the <release-name> with the name of the release you used during installation and the <new version number> with the SecureLLM version you want to upgrade to.
helm upgrade <release-name> dkubex-helm/securellm -n securellm --reuse-values --version <new version number> --wait
helm upgrade dkubex-securellm dkubex-helm/securellm -n securellm --reuse-values --version 0.5 --wait
Uninstalling SecureLLM
To uninstall SecureLLM, use the following steps.
Get the name of the deployed release by running the following command.
helm list -n securellmRun the following command on your system terminal. Replace the <release-name> with the name of the release you used during installation.
helm uninstall <release-name> -n securellm --wait --cascade=foreground
helm uninstall dkubex-securellm -n securellm --wait --cascade=foreground
SecureLLM UI
From the browser, access the DKubeX UI from the URL provided to you.
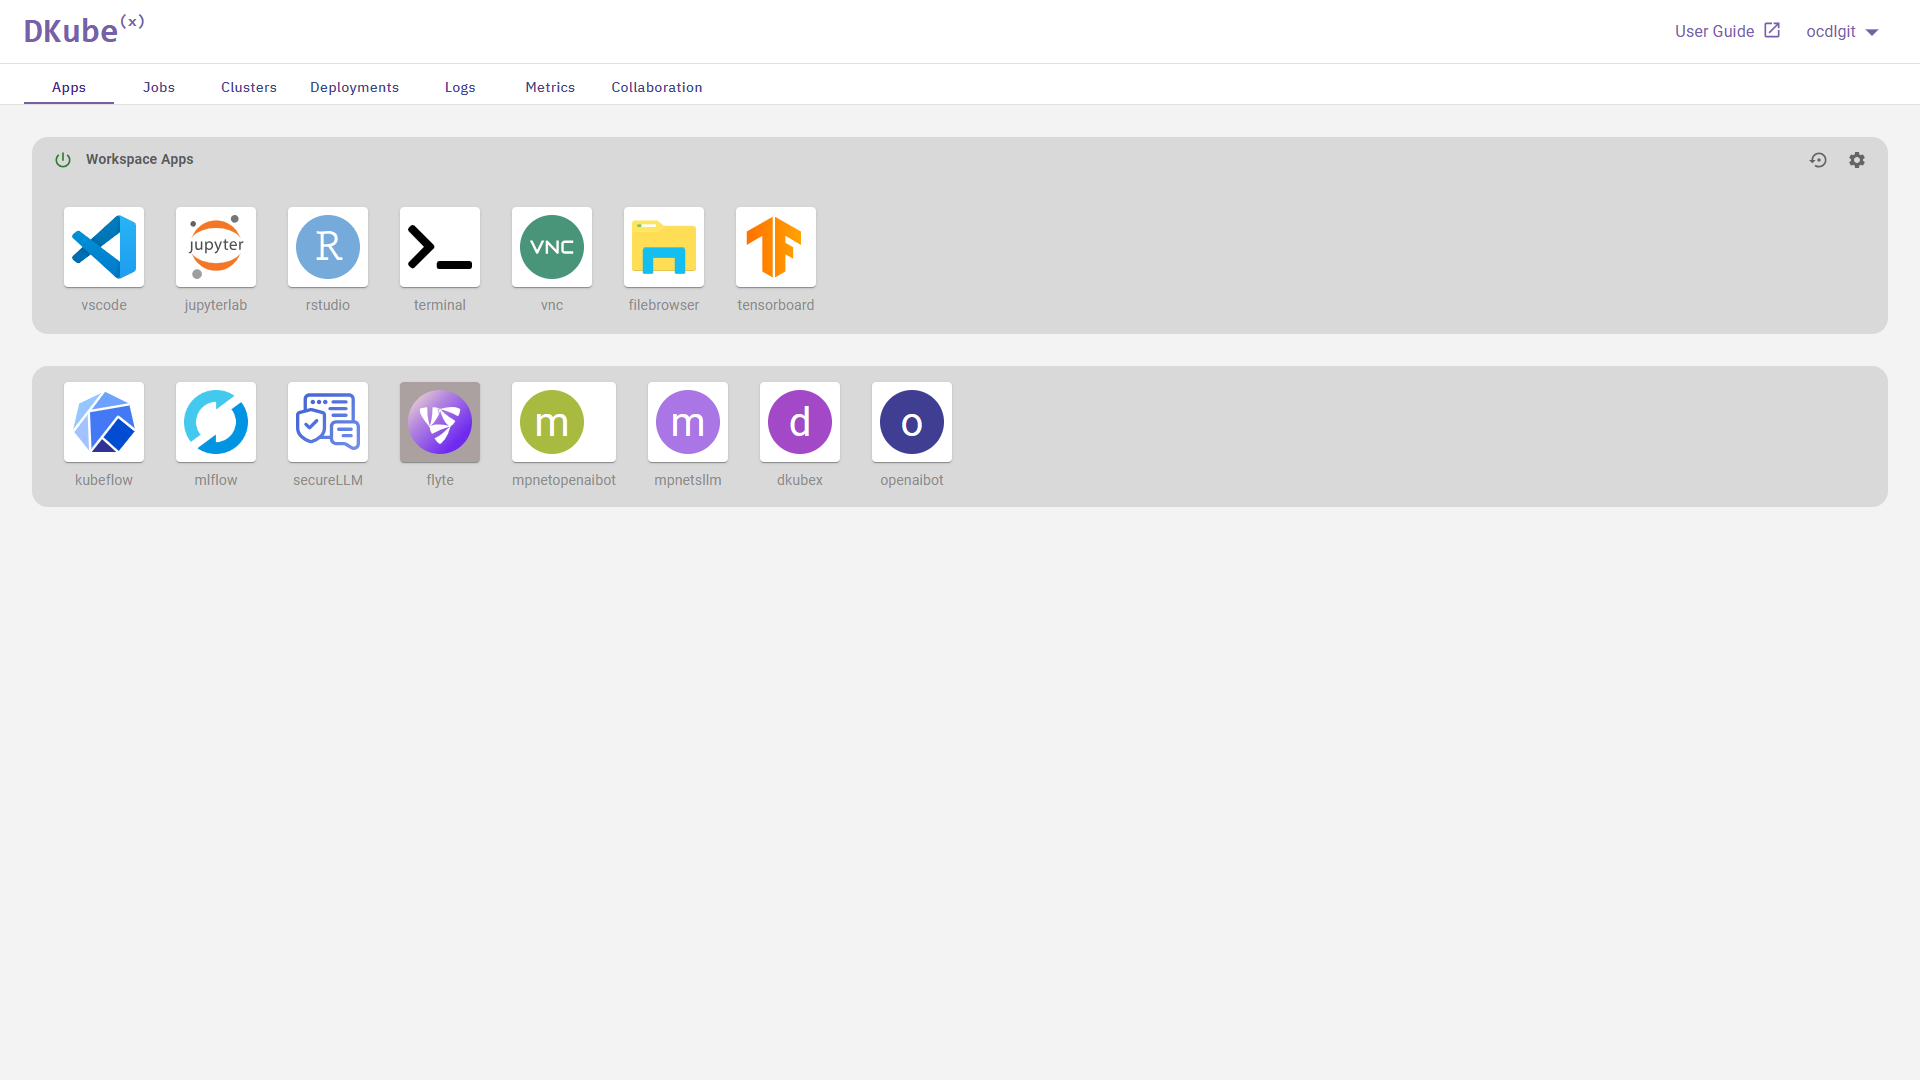
On the Apps tab of DKubeX UI, you will find the SecureLLM app icon in the list of user applications provided. Click on the icon.
The SecureLLM Login screen will open with two options: Admin Login and Continue as DKubeX User.
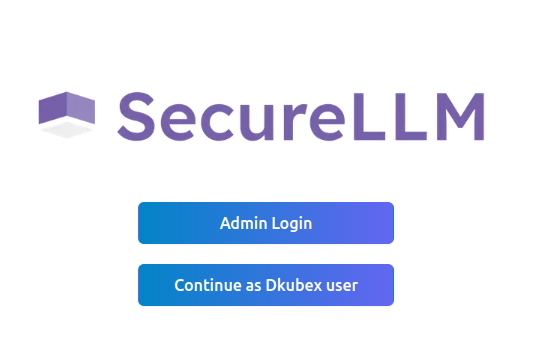
Admin Login
The Admin Login gives access to the SecureLLM UI Dashboard and all the features of SecureLLM. To log in as an admin, click on the Admin Login button on the SecureLLM Login screen and provide the admin credentials set during installation.
Note
If you do not have the SecureLLM login credentials, please contact your administrator.
The SecureLLM UI will open. This UI contains all the features of SecureLLM, which are described below.
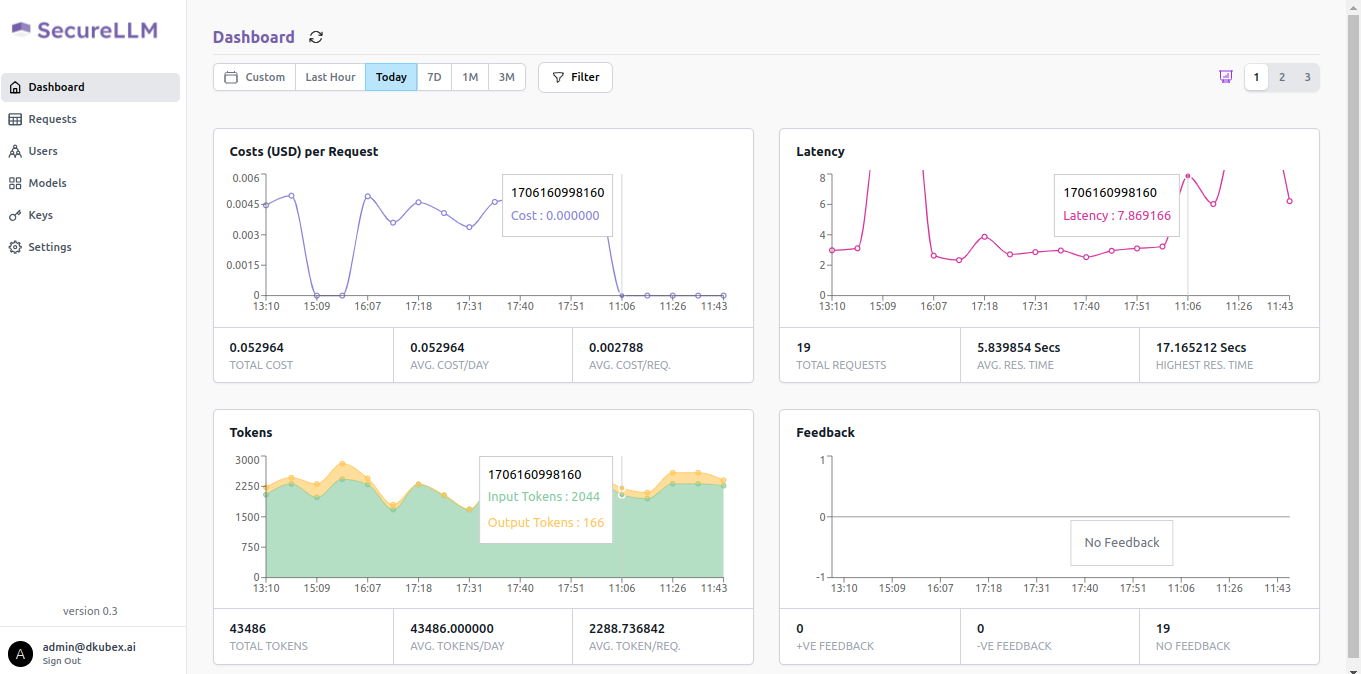
SecureLLM Dashboard provides graphical representation of data regarding all LLM requests processed via SecureLLM during a specific time range.
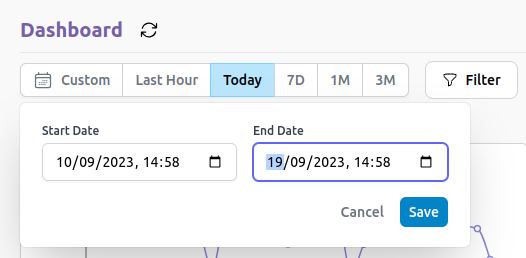
To set the range of time, click on the time filter at the top of the screen. For a custom time range, the exact time and date of the start and end of the range needs to be specified.
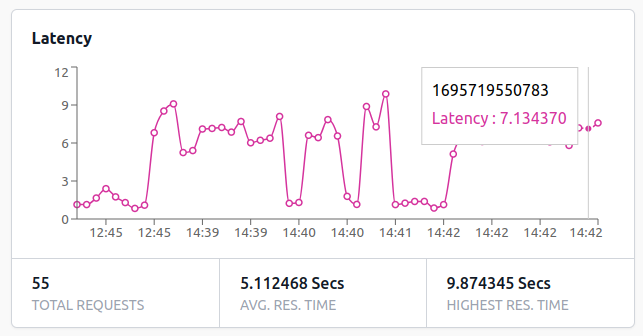
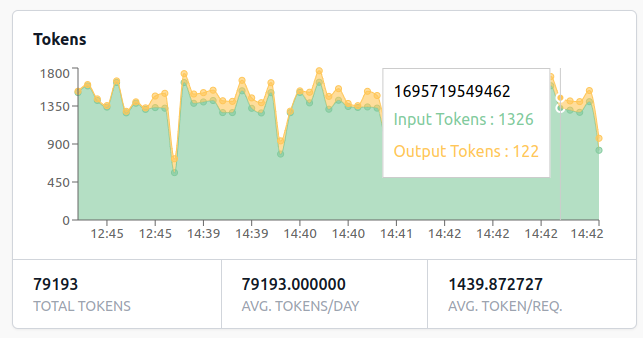
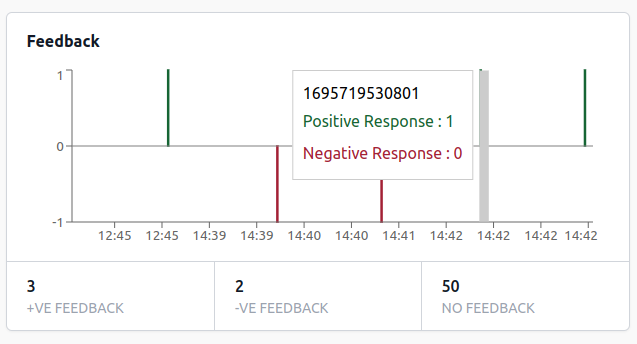
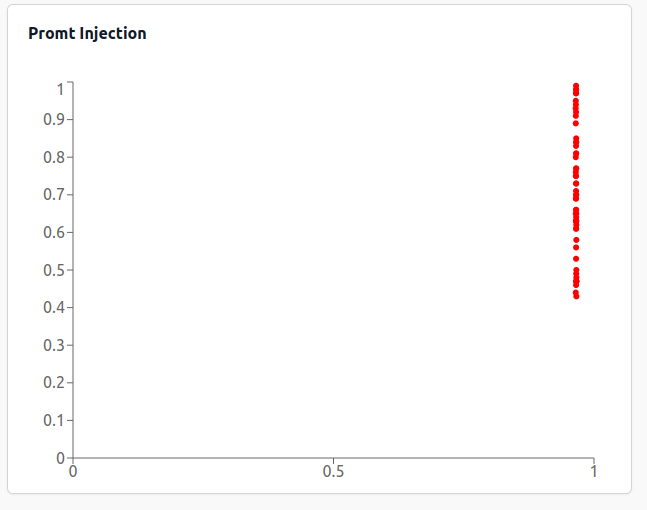
A total of 9 sets of data are displayed on this dashboard.
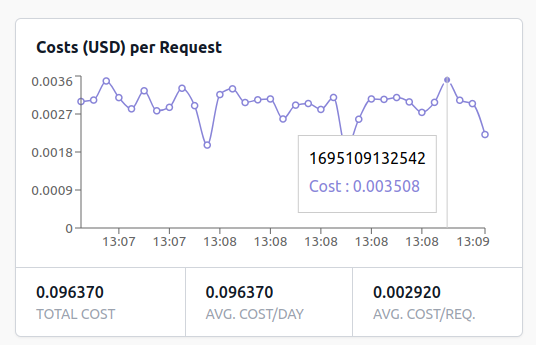
Cost of tokens spent (in USD) plotted against time during the set time range.
Time required for the LLM to respond to the user request plotted against time during the set time range.
Tokens spent for the requests and response plotted against time during the set time range.
Number and type of user feedback provided plotted against time during the set time range.
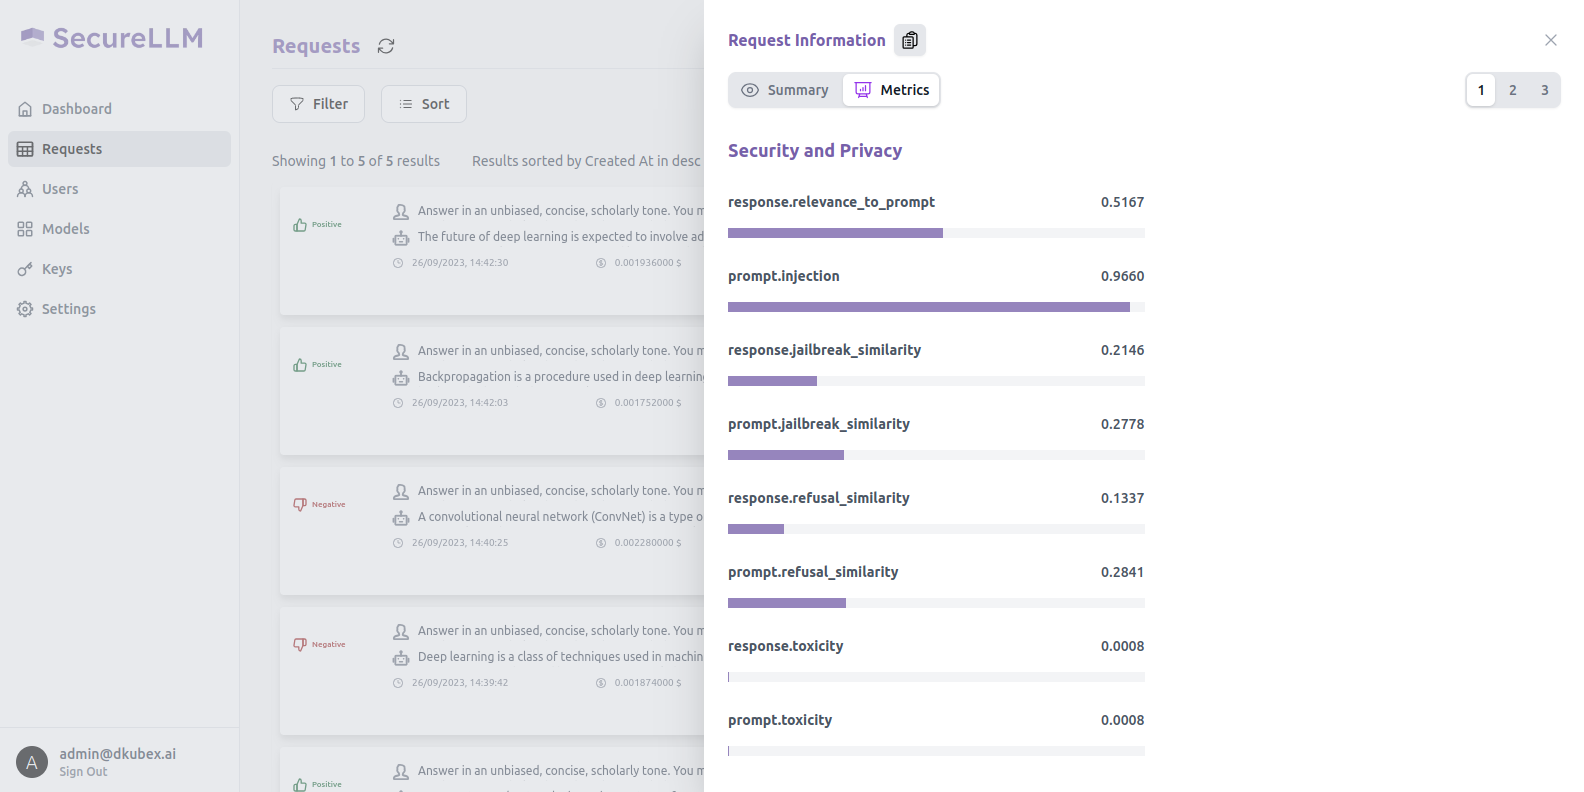
Shows metrices regarding prompt injection attacks.
Plots prompts and responses according to jailbreak similarity.

Shows metrices regarding toxicity of prompts.

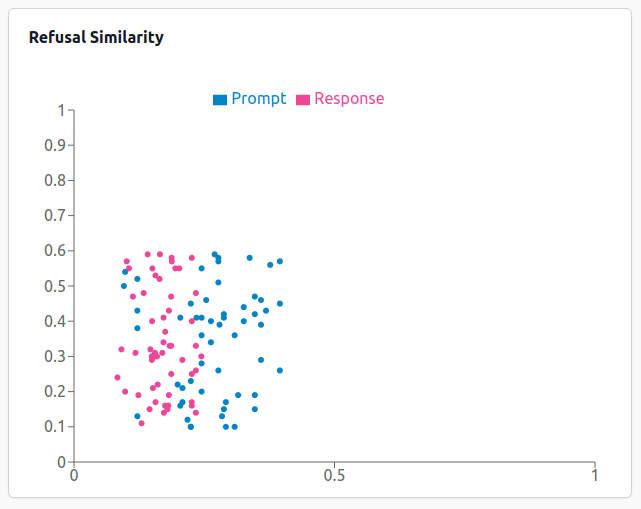
Shows metrices regarding refusal similarity.
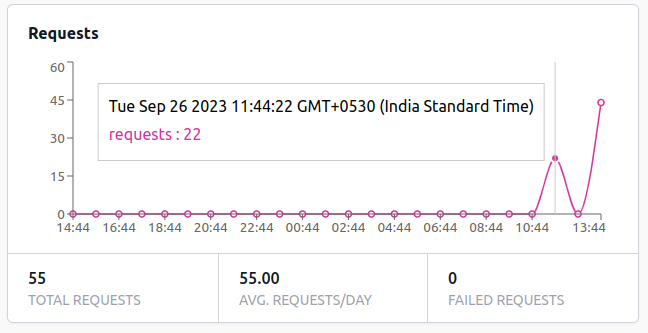
Number of LLM requests plotted against time during the set time range.
All the requests by all users across all the applications which are onboarded to SecureLLM are recorded in the Requests section. Data regarding all these requests can be monitored by requests, by users or by models.
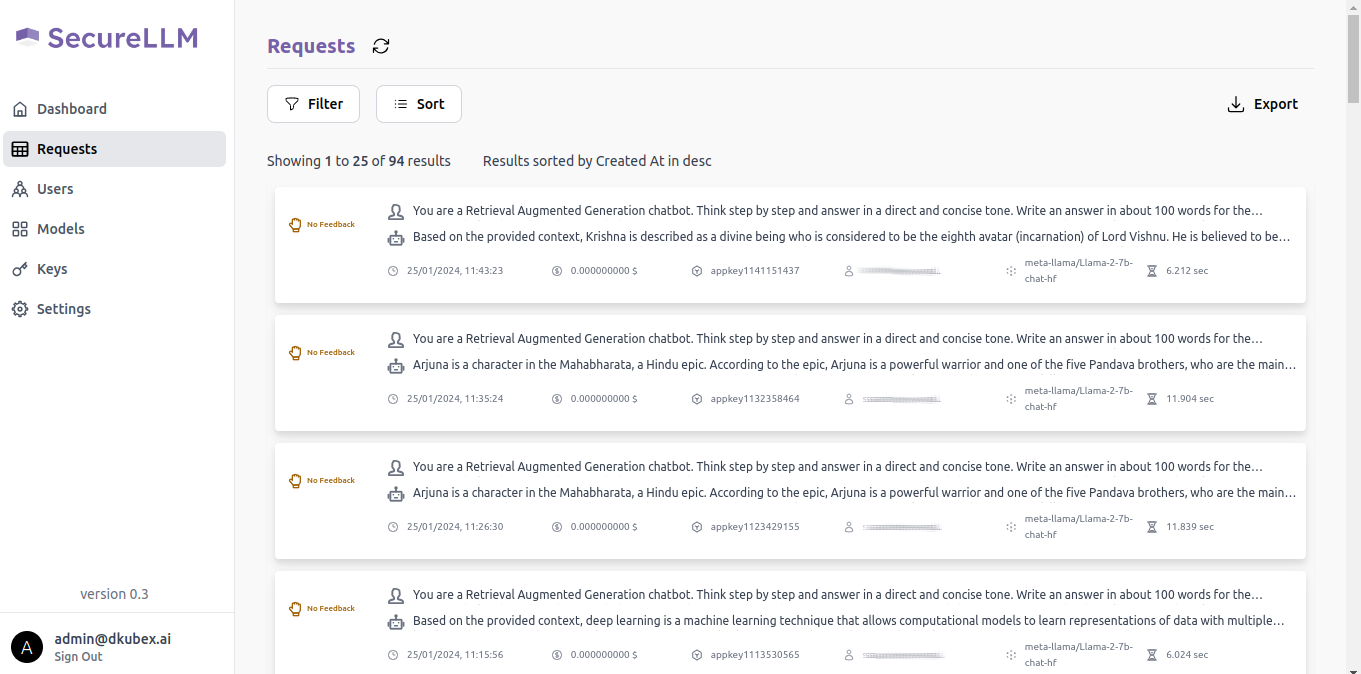
For details regarding this section, please visit Monitoring User Requests on SecureLLM.
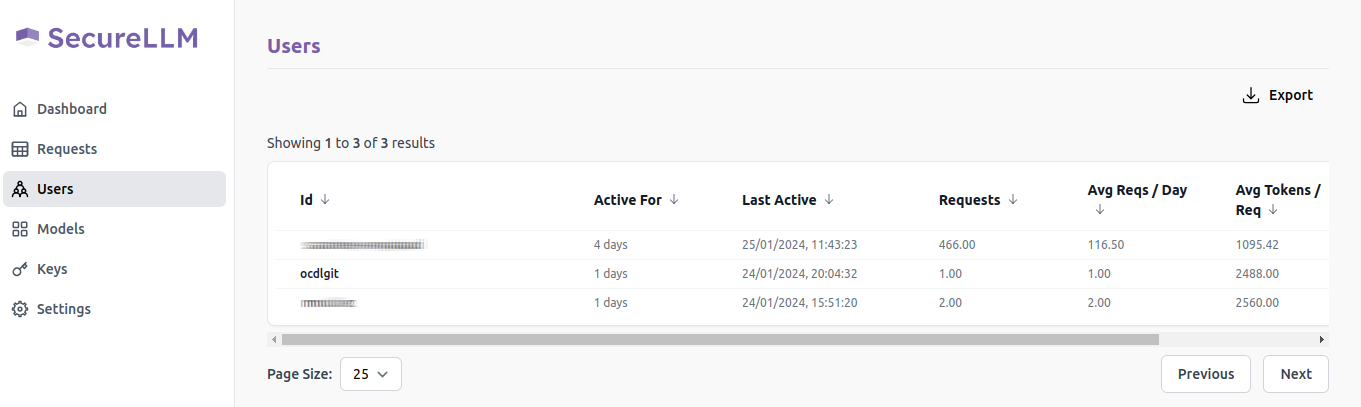
Clicking on the Users option on the left sidebar opens the Users page, which contains details of the users that have used SecureLLM and data regarding their usage.
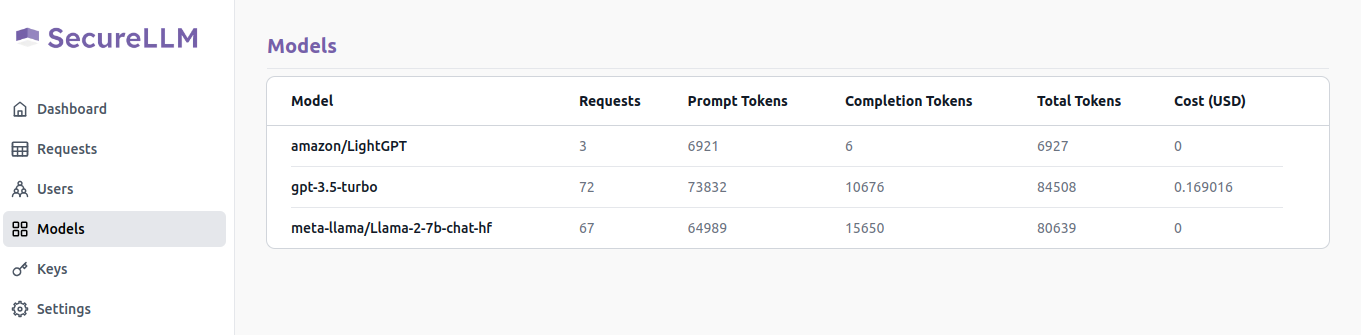
The Models page contains details of all the LLM models that have been used for all the requests that SecureLLM has recorded.
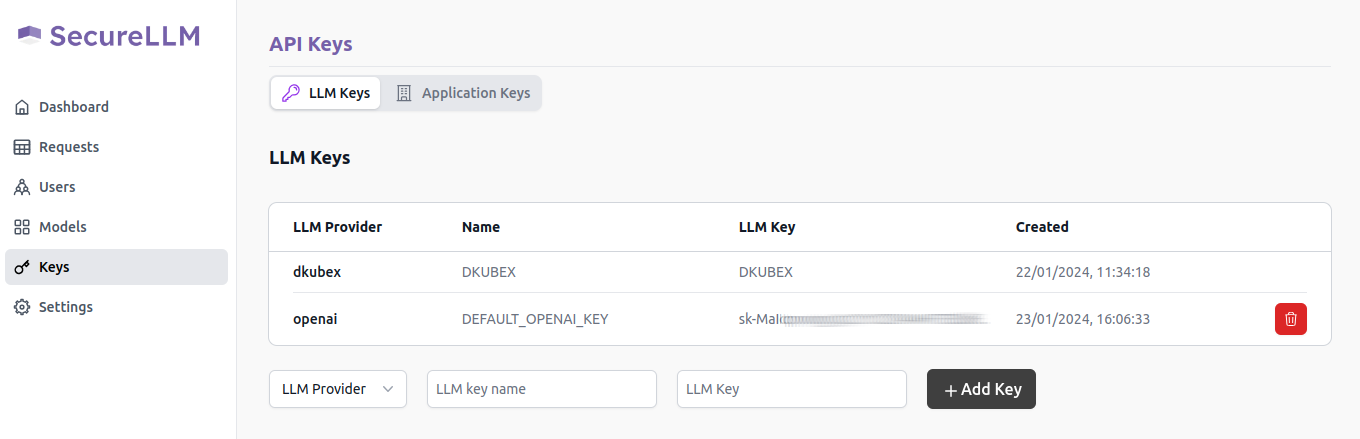
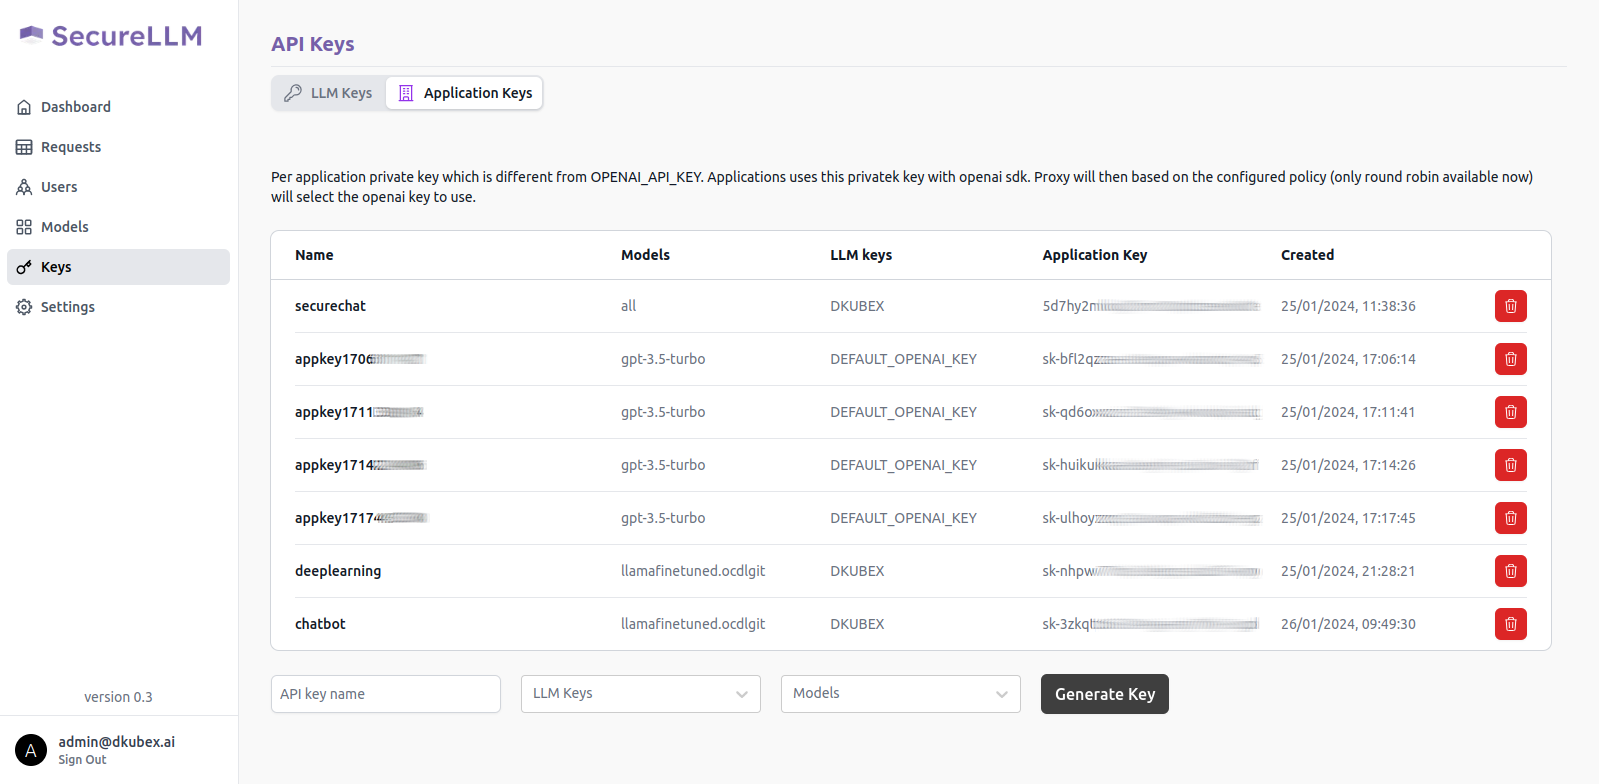
The Keys page contains details regarding all API keys (LLM keys and SecureLLM application keys), along with the option to add, create and delete new API keys. For more information regarding this, please visit Using SecureLLM.
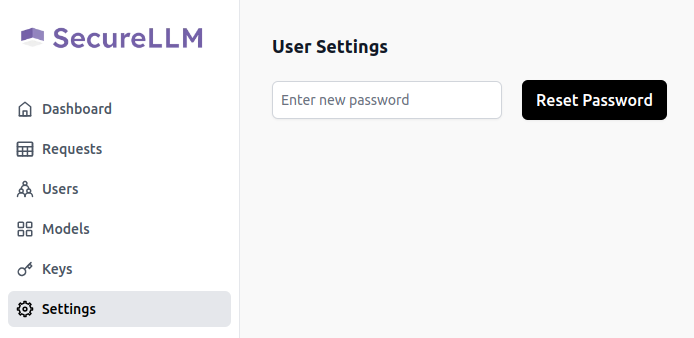
You can change your SecureLLM password by entering the new password in the user settings page and clicking on the Reset Password button.
Continue as DKubeX User
Continuing on SecureLLM as a DKubeX user gives read-only access to the SecureLLM Dashboard and the Requests page. To continue as a DKubeX user, click on the Continue as DKubeX User button on the SecureLLM Login screen. No credentials are required when logging in as a user in SecureLLM.
Using SecureLLM
Managing API Keys
SecureLLM provides the option to add, create and delete API keys. There are two types of API keys in SecureLLM-
LLM keys: These are the keys provided by the LLM providers which are used to access the LLMs.
Application keys: These are the keys created by users for the applications which are to be onboarded to SecureLLM.
Adding and Deleting OpenAI Keys
Please make sure you have access to a valid OpenAI key. If you do not have access to a valid OpenAI key, please follow the provided steps in the following page: OpenAI API Keys
Open SecureLLM UI and click on Keys on the left sidebar.
In this page, under the LLM keys tab, the list of all available OpenAI keys will be present. To add the new key, use the following steps.
From the LLM Provider dropdown list, select openai.
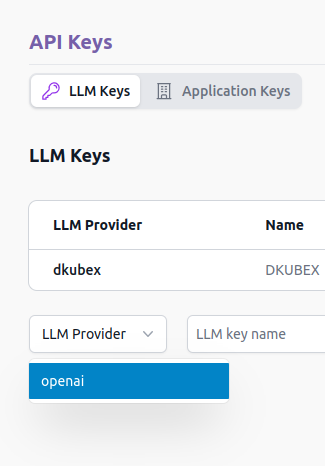
In the LLM key name field, provide a unique name for the key to be added.
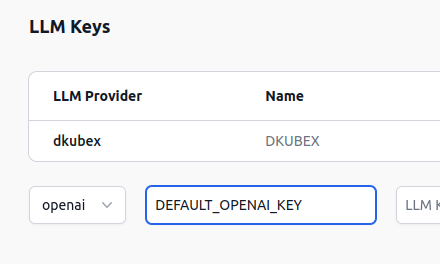
In the LLM Key field, provide the newly created OpenAI key and click on the + Add Key button.
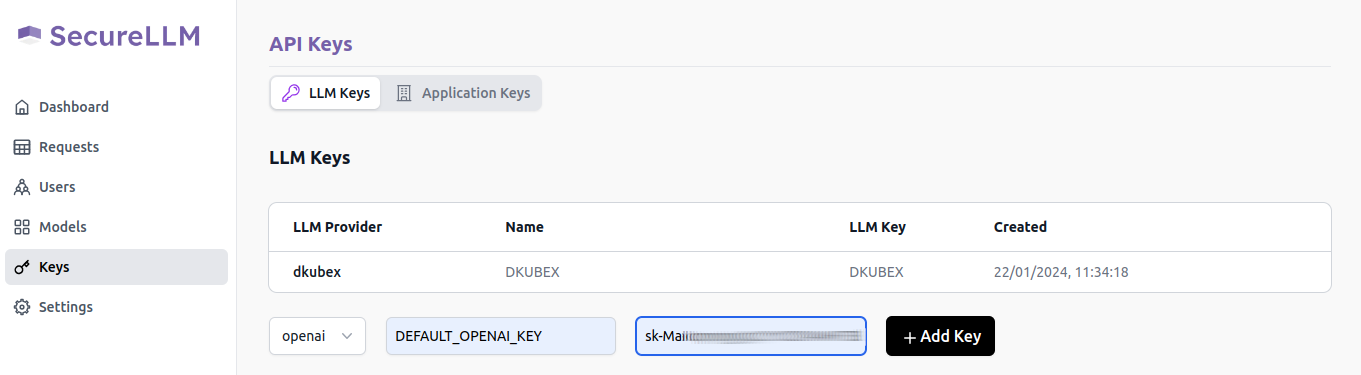
Your newly added OpenAI key will be visible on the list of keys now.
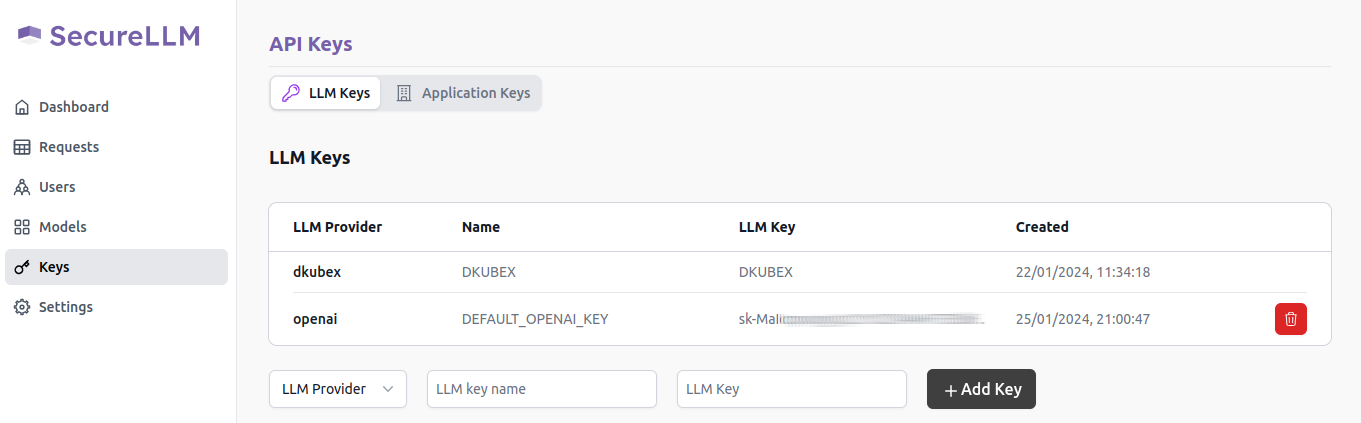
To delete an existing OpenAI key from SecureLLM, apply the following steps-
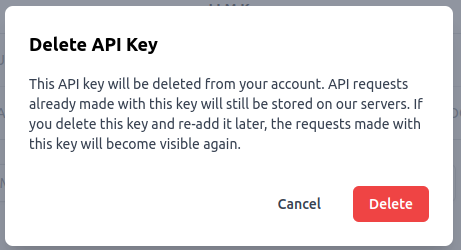
Click on the Delete button at the rightmost end of the row containing the key that you want to delete.
Click on the Delete button on the Delete API Key pop-up window. The key will be deleted from your SecureLLM account.
Creating and Deleting Application Keys
Open SecureLLM UI and click on Keys on the left sidebar.
In this page, under the Application keys tab, the list of all available application keys will be present.
To create a new key for your application, use the following steps:
On the API key name field, provide a unique name for the key to be created.
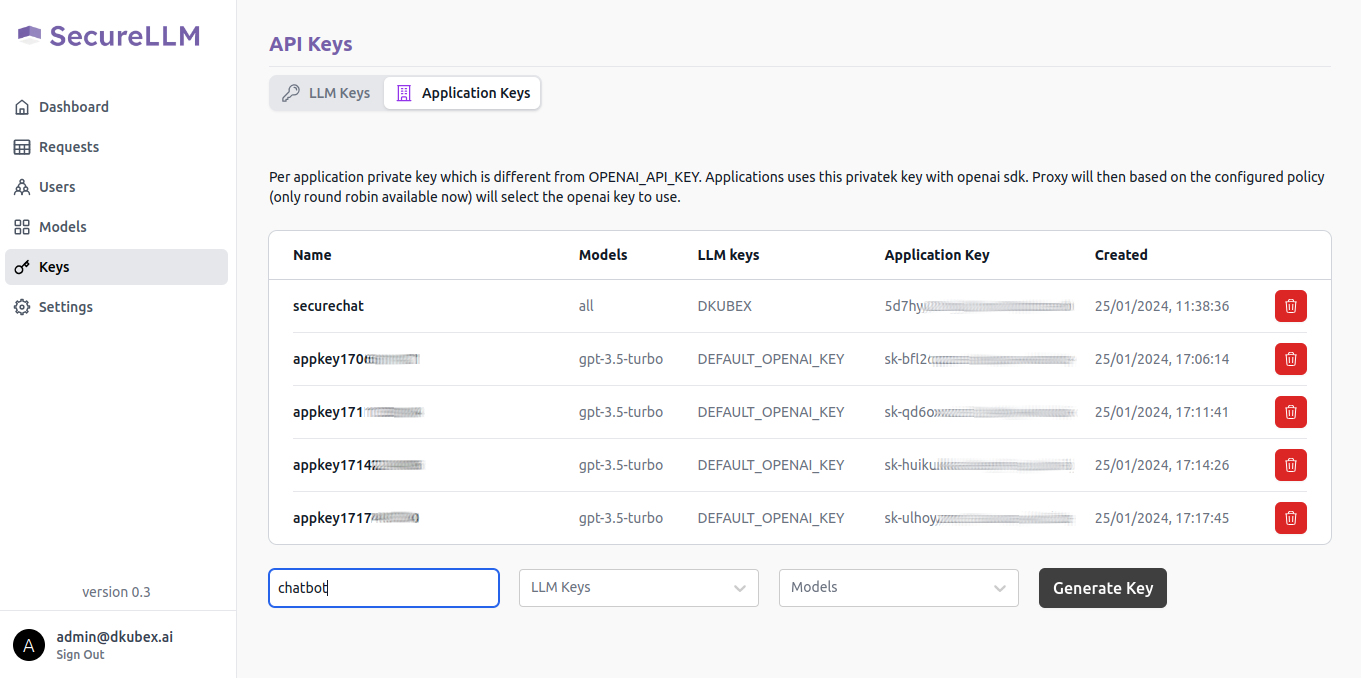
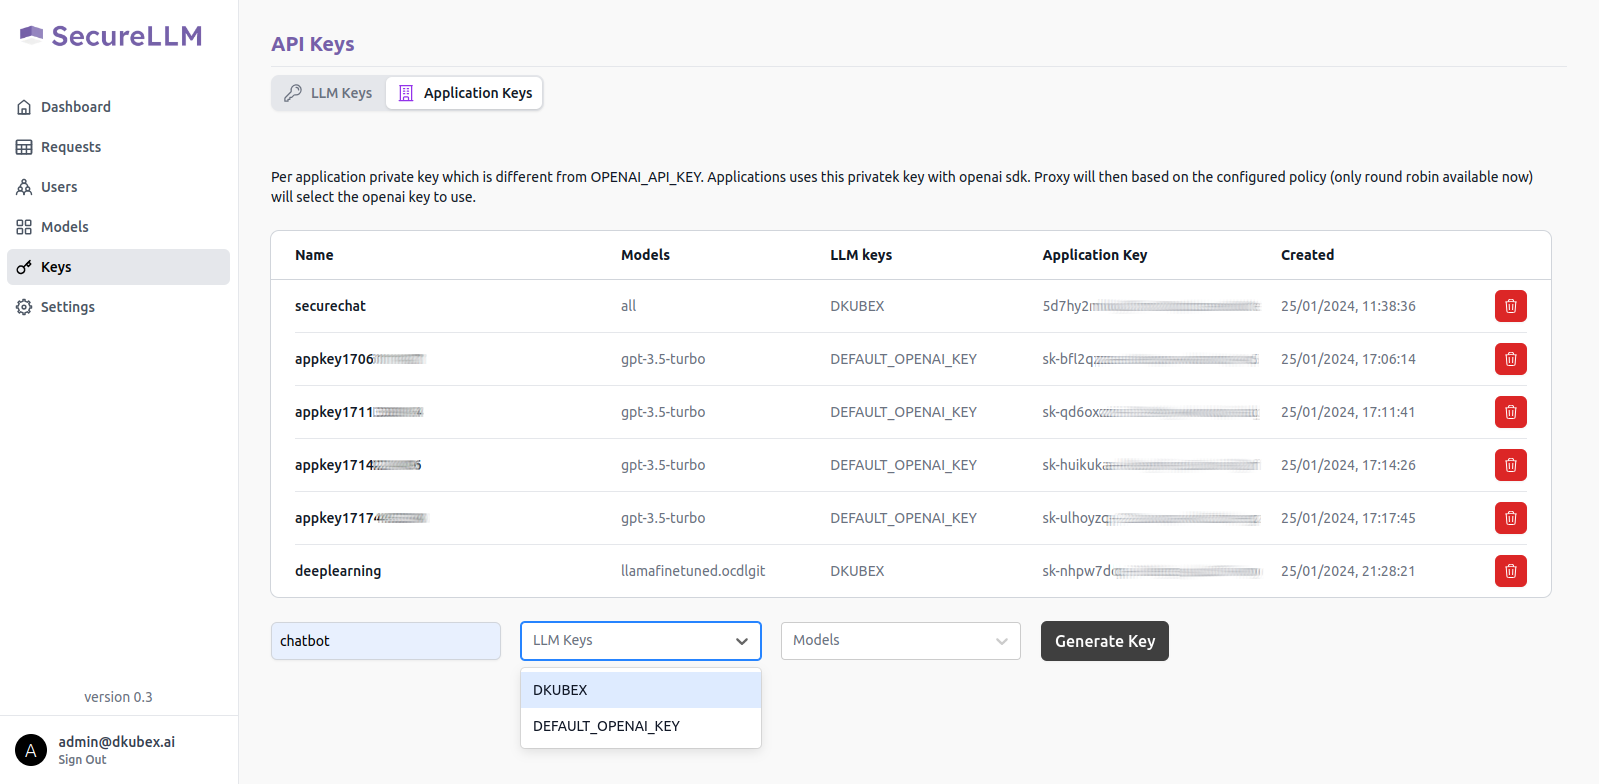
From the LLM Keys dropdown list, select the LLM key from the LLM Keys list you are going to use with this application key.
Hint
If you are going to use models deployed in DKubeX, use the DKUBEX key. Otherwise, use the key of the LLM provider you are going to use.
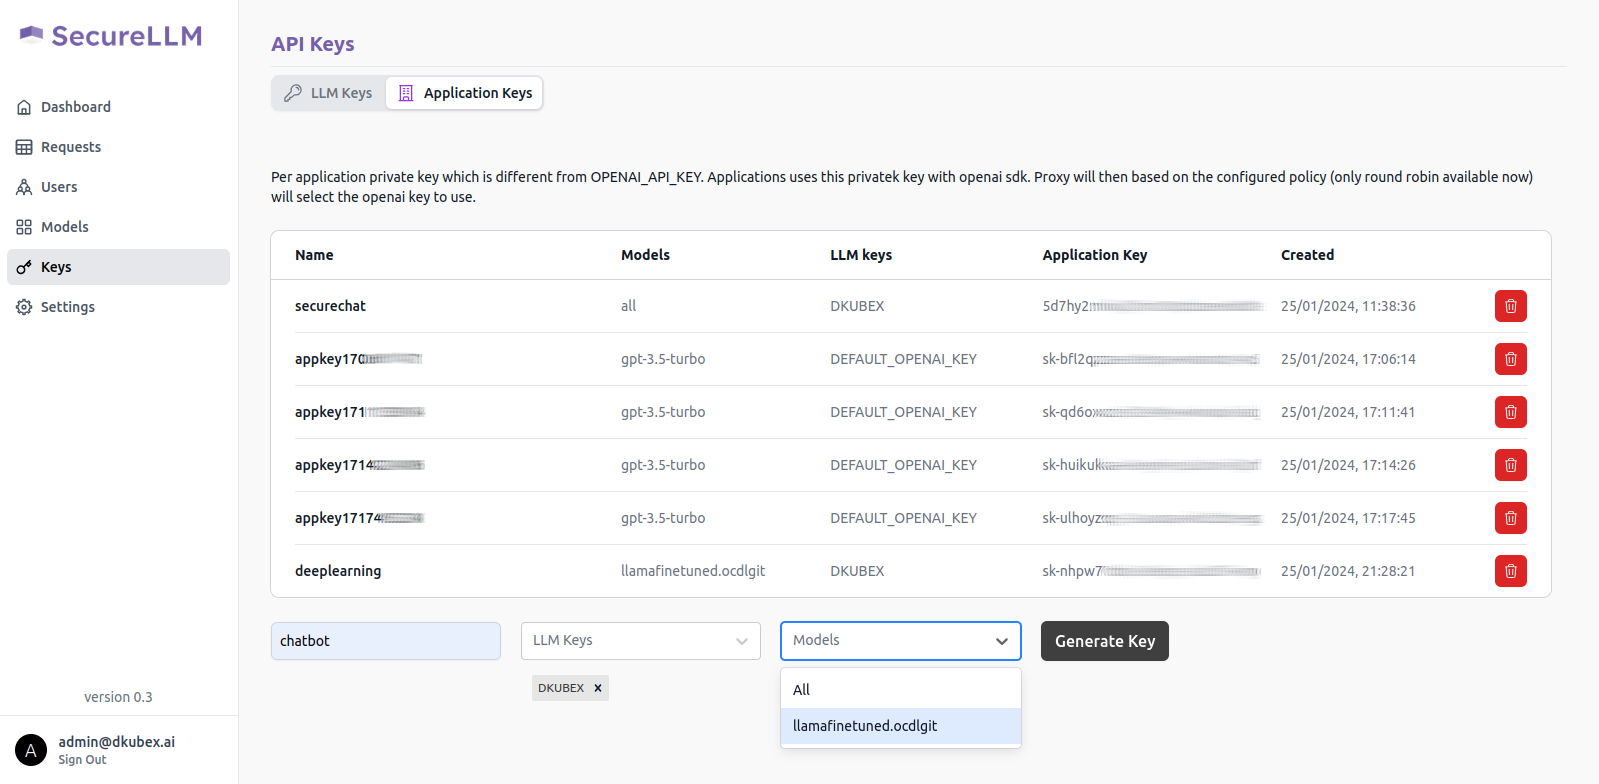
From the Models dropdown list, select the LLM model to be used. This list shows the LLM models associated with the LLM key mentioned in the previous step.
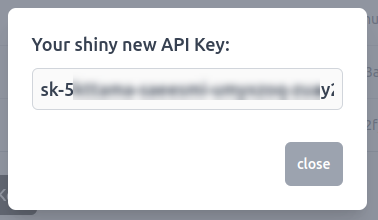
Click on the Generate Key button.
A pop-up window will show up on your screen containing the application key for your new application. Alternatively, you can also access your application key from the list of keys in the Application Key tab.
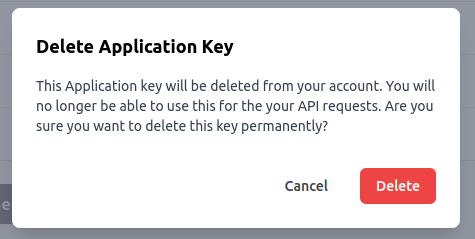
To delete an existing application key from SecureLLM,
Click on the Delete button at the rightmost end of the row containing the key that you want to delete.
Click on the Delete button on the Delete application key pop-up window. The application key will be removed from SecureLLM.
Integrating SecureLLM with Application
To integrate SecureLLM with your own application, the following changes should be made in the environment variables of the application.
Change the host endpoint to
<host endpoint url>Change the API key of the authorization bearer to the key generated in the Applications page of SecureLLM for that particular application.
For instance, in the following example
curl https://api.openai.com/v1/models \
  -H "Authorization: Bearer $OPENAI_API_KEY" \
The https://api.openai.com/v1/models part should be replaced with
<host endpoint url>The $OPENAI_API_KEY should be replaced with the application key generated and shown in the Applications page.
Monitoring User Requests on SecureLLM
All the requests by all users across all the applications which are onboarded to SecureLLM are recorded. Data regarding all these requests can be monitored by requests, by users or by models.
Click on the Requests button on the left sidebar on the SecureLLM UI. The Requests page will open, listing all the recorded requests and their data.
Clicking on one of the requests opens a new side-window- Request Information, which contains more detailed information about that particular request.
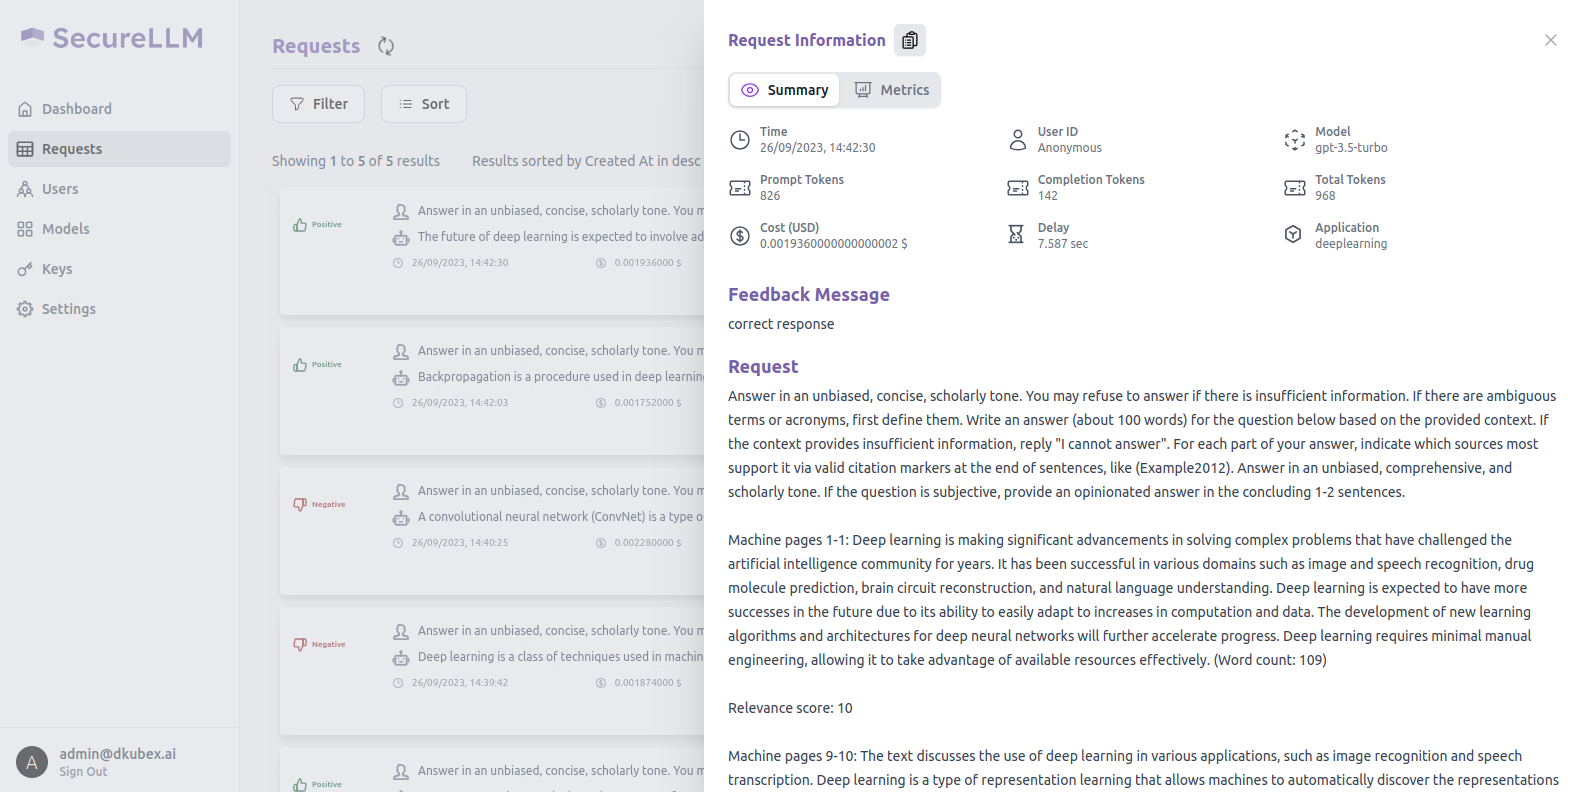
On the Metrics tab in the Request Information side window, extensive data and metrics are available.