DKube-Specific Steps for an Existing Rancher Cluster
This section describes the setup required to install DKube on an existing Rancher cluster.
Important
The versions of software must be consistent with the prerequisites at Prerequisites
To install DKube on a system, it is assumed that:
A Rancher Server has been created
All the nodes have a static IP address
Docker CE has been installed on the installation node
Note
The instructions to set up the cluster above assume an existing on-prem or VM cluster
Setting up the Rancher Cluster
Updating the cluster.yml File
In order to prepare the Rancher cluster for running DKube, the cluster.yml file needs to be modified to include extra_args under kube-controller and kube-api. This can be accomplished by editing the cluster configuration from the Rancher UI. The information is provided here:
Execute the Rancher Server Run Command
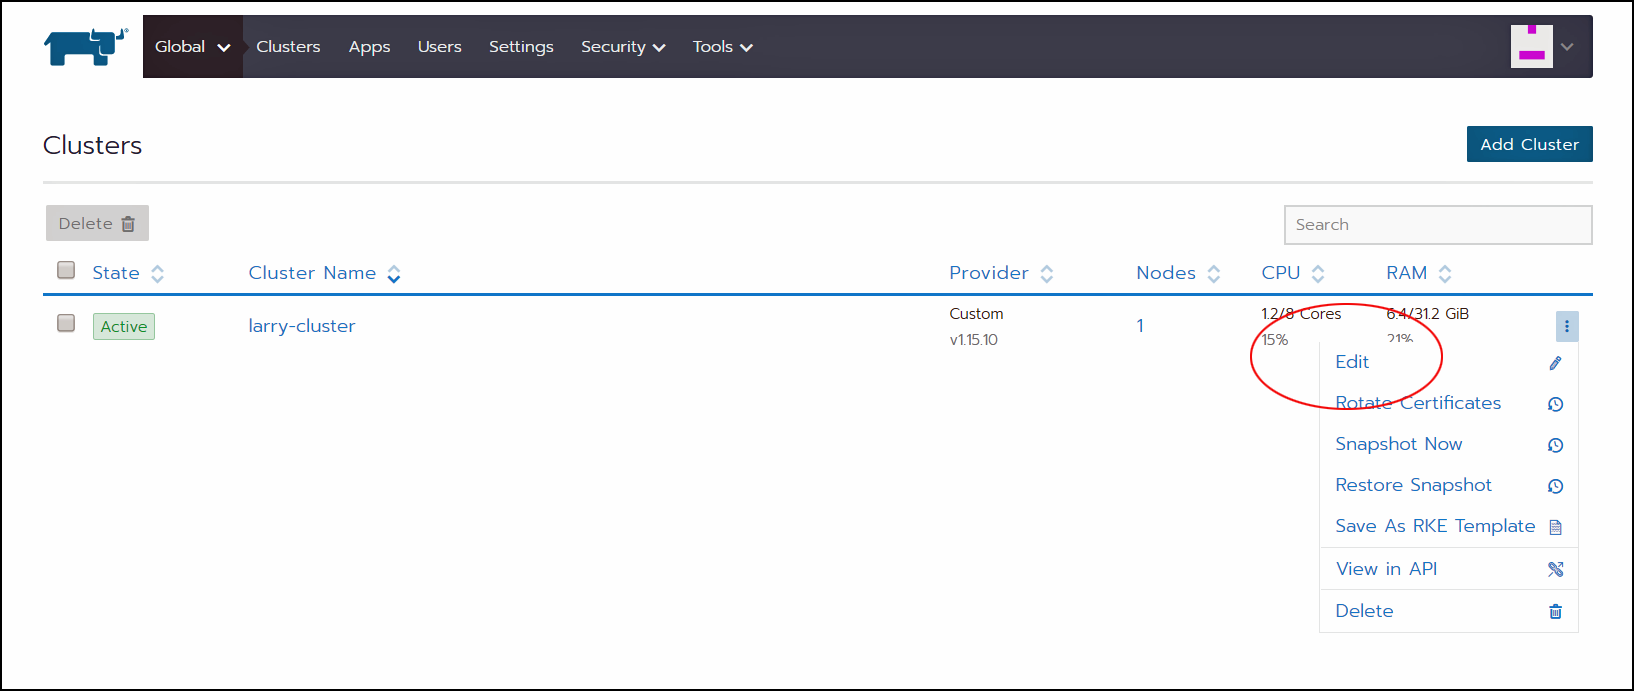
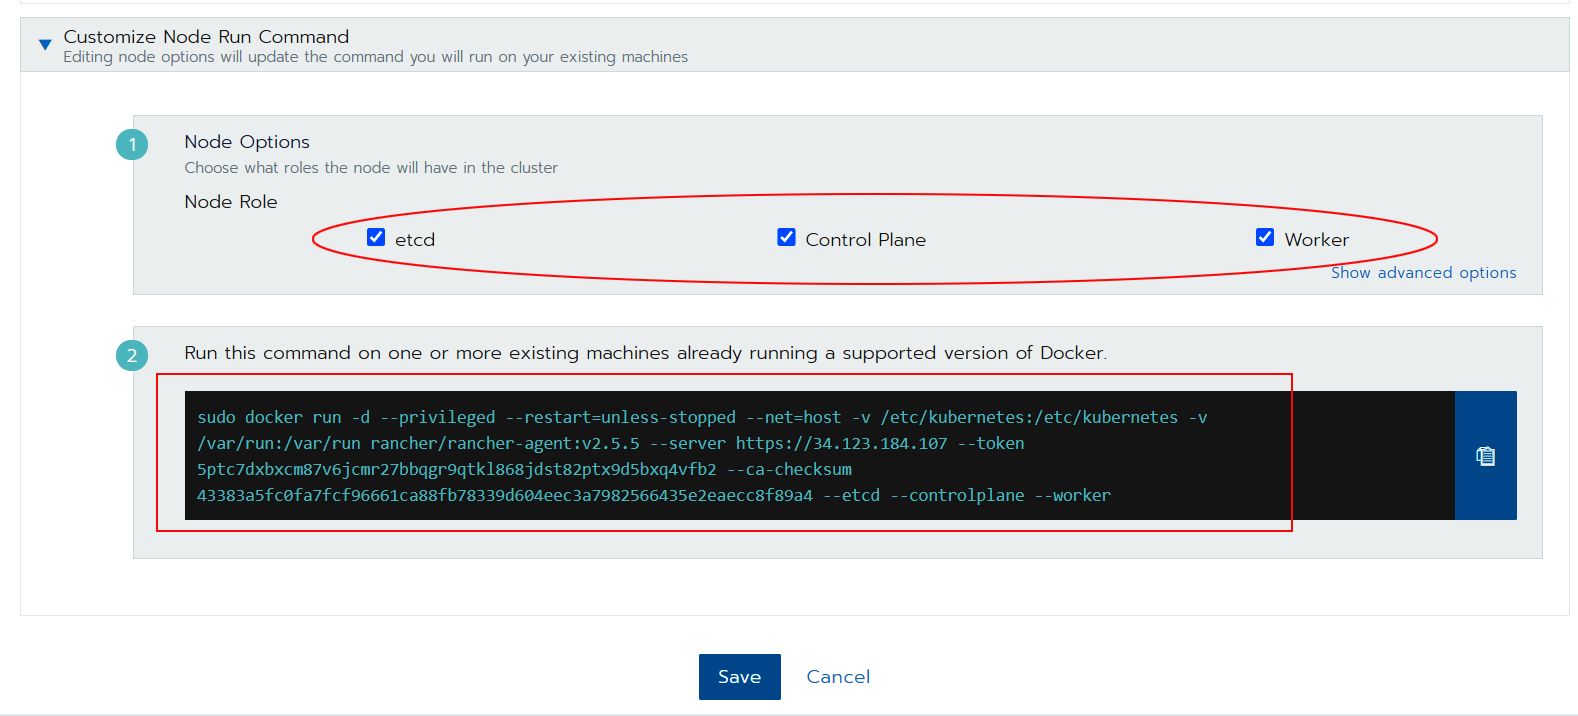
In order to create k8s on the DKube cluster, the Run command must be executed on each node in the DKube cluster. The Run command is generated during the Add Cluster procedure on the Rancher Server, and can be obtained later from the Edit screen as shown below.
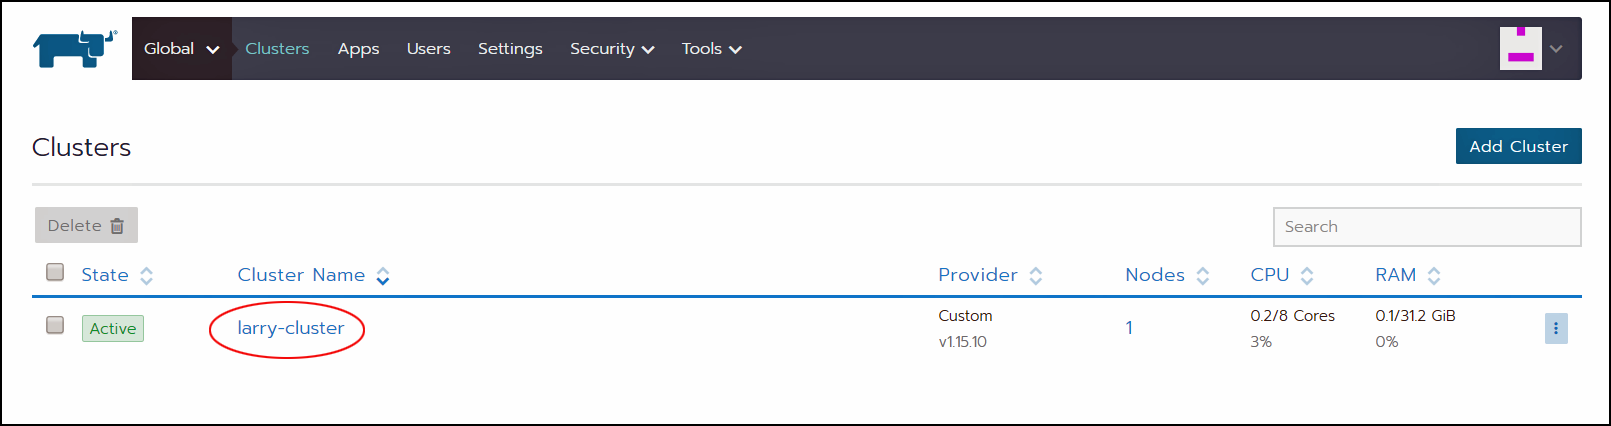
The execution of the Run command on the DKube node will initiate activity on the Rancher Server. When the activities have been complete the Rancher Server will show an Active status.
Copying the Kubeconfig file to the DKube Cluster Installation Node
The Kubeconfig file from the Rancher Server must be copied to the installation node (either a remote installation node or the master node in the cluster). The Kubeconfig file can be found by selecting the cluster name.

The contents of the Kubeconfig file should be put into the file $HOME/.dkube/kubeconfig on the installation node.
Note
Note that the name kubeconfig must be all lower case
Preparing the Rancher Cluster
This section describes how to prepare the Rancher cluster for DKube installation. The steps are executed from the $HOME/.dkube folder. The k8s.ini file needs to be edited in order do the setup command.
Editing the k8s ini File
The k8s.ini file has the following format:
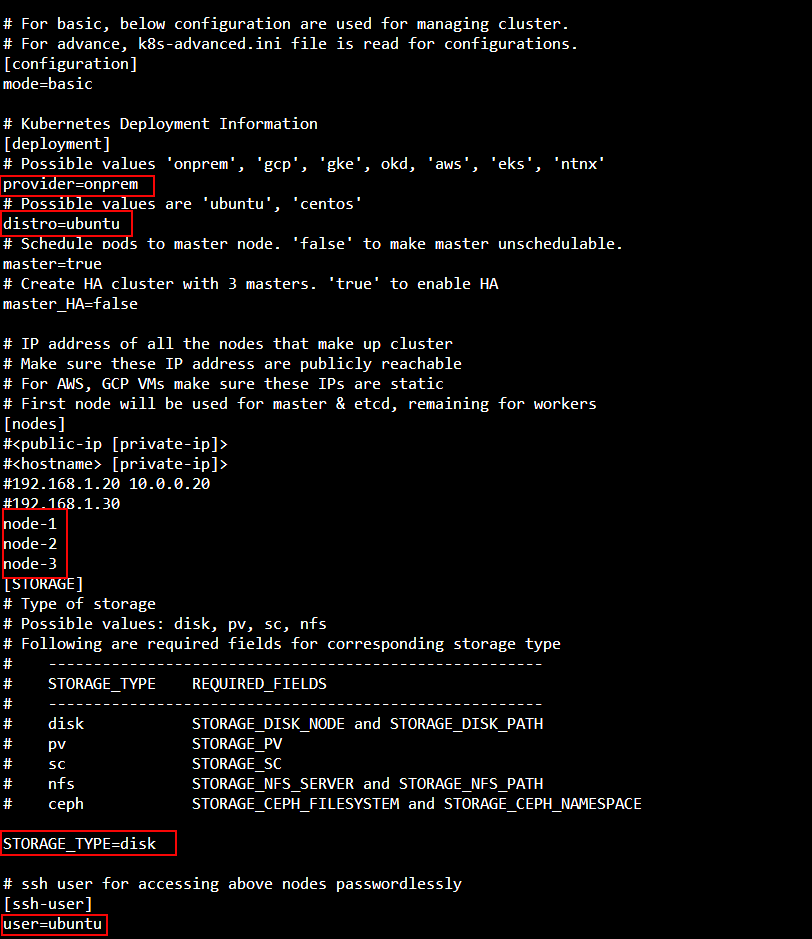
Only the following fields should be filled in:
Field |
Value |
|---|---|
provider |
onprem |
distro |
Operating system type |
nodes |
Node names from the Rancher server UI |
STORAGE_TYPE |
disk |
user |
The user name for the DKube cluster account |
User
This is the DKube cluster user account name. It can be a root or non-root account, but the same account must be available on all cluster nodes, and must have passwordless access through an ssh key and sudoers permissions.
Changing Nodes or GPUs on Cluster After DKube Installation
In order to enable DKube to recognize changes in nodes or GPUs in the cluster after the initial installation, the following steps should be performed.
For changes in nodes
Edit the $HOME/.dkube/k8s.ini file to add the new nodes as described in this section
The other fields should not be changed
Ensure that the new node is accessible passwordlessly from the installation node as described in Cluster Access from the Installation Node
For either node or GPU changes
Run the node setup command as described in Node Setup to install prepare the new nodes
DKube will automatically recognize the new nodes after the setup command.
Cluster Access from the Installation Node
In order to run the installation, the installation node needs to be able to access each node in the cluster without requiring a password. In each case, sudoers account access must be provided.
The sudoers file on each node must include the DKube cluster account name with the necessary access. This can be accomplished using the visudo command, and adding the following line:
Platform-Specific Cluster Access
The cluster access instructions depend upon the type of cluster.
If DKube is going to be installed on an AWS cluster, the pem file from that cluster is used to provide access.
Copy the .pem key to the $HOME/.dkube folder
Use the following commands in the $HOME/.dkube folder to set up cluster access
If DKube is going to be installed on a GCP cluster, an ssh key pair is used to provide cluster access.
Important
Even in the case where the master node is used as the installation node, the ssh key pair must still be added to the master node authorized_keys file in the $HOME/.ssh directory
If you have an existing ssh key pair, it is assumed that the private key works with all of the DKube cluster nodes, including the master node. In this case, the following steps are required:
Copy the private key to the $HOME/.dkube directory. It needs to be copied with the name ssh-rsa
Delete the file ssh-rsa.pub from the $HOME/.dkube directory, since it will not match your new private ssh-key file
The initial Docker init creates an ssh key pair to allow passwordless access to the DKube cluster nodes.
If the ssh key pair created by the Docker init will be used for cluster access, then it’s public key file contents need to be added to the $HOME/.ssh/authorized_keys file on each node of the DKube cluster, including the master node. This can generally be accomplished by simply adding it with:
If that does not work, you can append the contents of ssh-rsa.pub to $HOME/.ssh/authorized_keys manually using the command:
Note
For gcp, it it sometimes necessary to also copy the contents of ssh-rsa.pub to the VM instance manually from the VM Instances dashboard

If DKube is going to be installed on an Azure cluster, an ssh key pair is used to provide cluster access.
Important
Even in the case where the master node is used as the installation node, the ssh key pair must still be added to the master node authorized_keys file in the $HOME/.ssh directory
If you have an existing ssh key pair, either from the initial VM creation or from a previously-generated key, it is assumed that the private key works with all of the DKube cluster nodes, including the master node. In this case, the following steps are required:
Copy the private key to the $HOME/.dkube directory. It needs to be copied with the name ssh-rsa
Delete the file ssh-rsa.pub from the $HOME/.dkube directory, since it will not match your new private ssh-key file
The initial Docker init creates an ssh key pair to allow passwordless access to the DKube cluster nodes.
If the ssh key pair created by the Docker init will be used for cluster access, then it’s public key file contents need to be added to the $HOME/.ssh/authorized_keys file on each node of the DKube cluster, including the master node. This can generally be accomplished by simply adding it with:
If that does not work, you can append the contents of ssh-rsa.pub to $HOME/.ssh/authorized_keys manually using the command:
If DKube is going to be installed on an On-Prem cluster, an ssh key pair is used to provide cluster access.
Important
Even in the case where the master node is used as the installation node, the ssh key pair must still be added to the master node authorized_keys file in the $HOME/.ssh directory
If you have an existing ssh key pair, it is assumed that the private key works with all of the DKube cluster nodes, including the master node. In this case, the following steps are required:
Copy the private key to the $HOME/.dkube directory. It needs to be copied with the name ssh-rsa
Delete the file ssh-rsa.pub from the $HOME/.dkube directory, since it will not match your new private ssh-key file
The initial Docker init creates an ssh key pair to allow passwordless access to the DKube cluster nodes.
If the ssh key pair created by the Docker init will be used for cluster access, then it’s public key file contents need to be added to the $HOME/.ssh/authorized_keys file on each node of the DKube cluster, including the master node. This can generally be accomplished by simply adding it with:
If that does not work, you can append the contents of ssh-rsa.pub to $HOME/.ssh/authorized_keys manually using the command:
Final Access Verification
After the security access steps have been taken, the user should ensure that each node in the cluster can be properly accessed by the installation node without a password.
The installation process should not move ahead if this verification step is not successful.
Node Setup
Before installing DKube, the necessary software packages need to be added to each node in the DKube cluster. The k8s.ini file was configured to provide the information necessary. The following command will install the packages required.
Note
If you have A100 GPUs installed on your cluster, please ensure that you follow the section Adding A100 GPUs to the Cluster
Installing DKube
DKube is installed using Helm. Continue the installation at Installing DKube