Advanced Installation Options
This section provides a more detailed description of the advanced installation options. The installation is configured by the file values.yaml. The following sections are contained in the configuration file:
Section |
Function |
Details |
|---|---|---|
Basic |
Basic, required configuration |
|
Storage |
Storage configuration |
|
Load Balancer |
Load balancer configuration |
|
CD/CD |
Enable and configure optional CI/CD capability |
|
Node Affinity |
Controls what types of jobs can run on which nodes |
Important
The fields must be entered with quotes
Basic Configuration
The top section provides the basic configuration information.
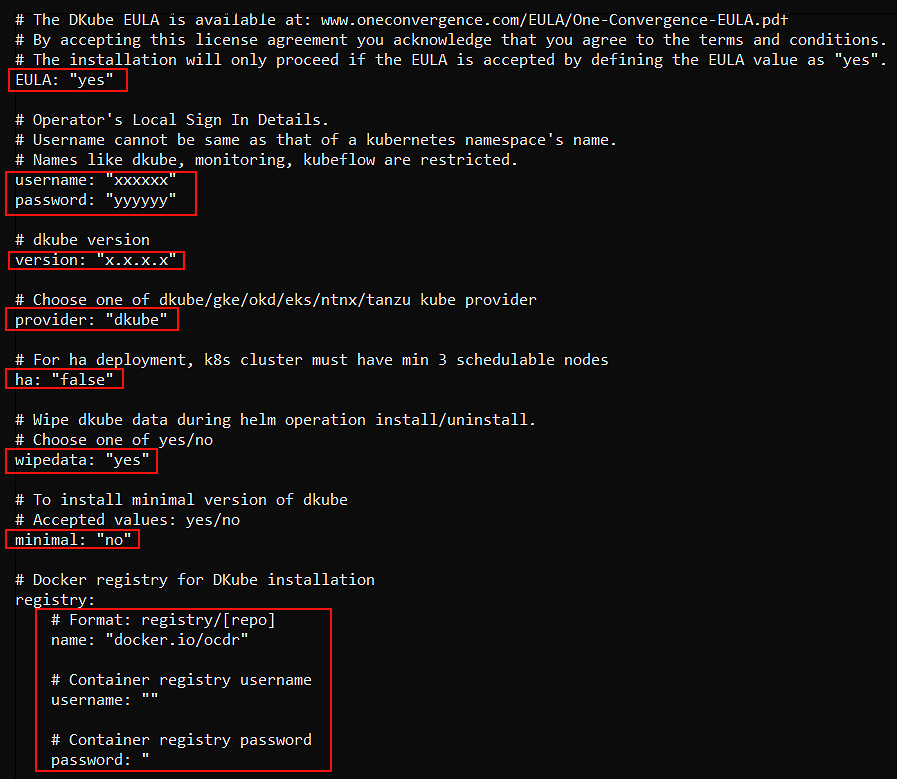
Field |
Value |
|---|---|
EULA |
yes |
username |
User-chosen initial login username |
password |
User-chosen initial login password |
version |
Version of DKube to install |
provider |
Kubernetes type as defined below |
ha |
Set true or false to enable/disable DKube resiliency |
wipedata |
Set no to use data from the previous DKube installation. This can only be used with the same version of DKube. |
minimal |
Active in Version R3.x only: Set no for full menu and features; Set yes to provide the Monitor-only menus and features |
registry |
Docker registry credentials - will be provided |
Important
The value wipedata=yes will remove all of the current DKube data from a previous installation. If this is a reinstallation, and you want to use your existing DKube data, set this field to no.
The provider field should be filled in as follows:
Kubernetes |
Value |
|---|---|
Amazon EKS |
eks |
Rancher RKE |
dkube |
VMWare Tanzu |
tanzu |
Resilient Operation
For highly available operation, DKube supports multi-node resiliency (HA). An HA system prevents any single point of failure through redundant operation. For resilient operation, at least 3 nodes are required. There are 2 different types of independent resiliency: cluster and DKube. Cluster resiliency is specific to the Kubernetes installation, and is managed by the cluster administorator.
Note
Since the master node manages the cluster, for the best resiliency it is advisable to not install any GPUs on the master nodes, and to prevent any DKube-related pods from being scheduled on them. It is up to the user to ensure that the cluster is resilient. Depending upon the type of k8s, the details will vary.
DKube Resiliency
DKube resiliency is independent of - and can be enabled with or without - cluster resiliency. If the storage is installed by DKube, resiliency ensures that the storage and databases for the application have redundancy built in. This prevents an issue with a single node from corrupting the DKube operation. Externally configured storage is not part of DKube resiliency. For DKube resiliency to function, there must be at least 3 schedulable nodes. That is, 3 nodes that allow DKube pods to be scheduled on them. The nodes can be master nodes or worker nodes in any combination.
In order to enable DKube resiliency, the HA option must be set to “true” in the configuration file, as described in the section on final installation.
Resiliency Examples
There are various ways that resiliency can be enabled at different levels. This section lists some examples:
Nodes |
Master Nodes |
Worker Nodes |
Master Schedulable |
Resiliency |
|---|---|---|---|---|
3 |
1 |
2 |
Yes |
DKube Only |
3 |
1 |
2 |
No |
No Resiliency |
3 |
3 |
0 |
Yes |
Cluster & DKube |
4 |
1 |
3 |
Yes/No |
DKube Only |
4 |
3 |
1 |
Yes |
Cluster & DKube |
4 |
3 |
1 |
No |
Cluster Only |
6 |
3 |
3 |
Yes/No |
Cluster & DKube |
Username and Password
This provides the credentials for initial DKube local login. The initial login user has both Operator and Data Science access. Only a single user can log in with this method. More users can be added through a backend access configuration using the OAuth screen.
Do not use the following usernames: * dkube * monitoring * kubeflow
Storage Options
The storage options are configured in the storage section of the file. The settings depend upon the type of storage configured, and whether the DKube installation will be HA or non-HA.
DKube can be configured to use the local storage on the nodes. The storage configuration will depend upon whether DKube is in HA or non-HA mode.
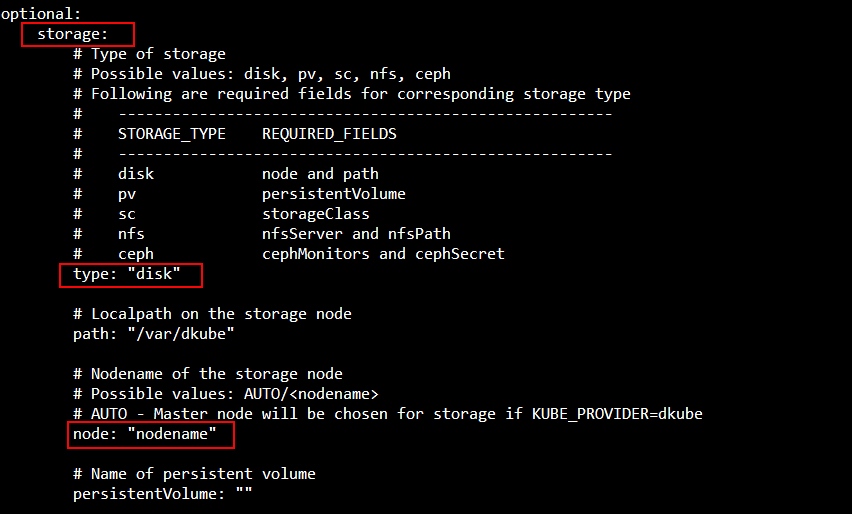
Field |
Value |
|---|---|
type |
disk |
The node field will depend upon the platform type and the resiliency configuration (HA or non-HA).
Platform |
Resiliency |
Value |
|---|---|---|
Rancher |
non-HA |
Node name as identified in the Rancher Server UI |
Rancher |
HA |
Value ignored - DKube will create an internal Ceph cluster using the disks from all of the nodes |
EKS |
non-HA |
EKS host name |
EKS |
HA |
Value ignored - DKube will create an internal Ceph cluster using the disks from all of the nodes |
NFS is configured the same for all platforms and for HA and non-HA.
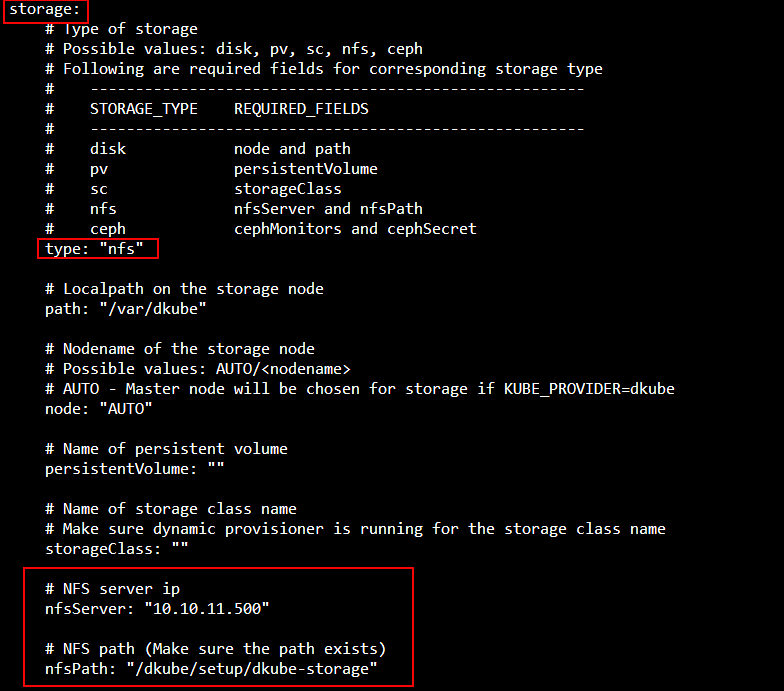
Field |
Value |
|---|---|
type |
nfs |
nfsServer |
Internal IP address or DNS server name of nfs server |
nfsPath |
Absolute path of the exported share |
Note
The NFS export path should be accessible to the master and worker nodes, configured for read/write and no_root_squash access, but should not be mounted. DKube will perform its own mount.
Ceph is configured the same for all platforms and for HA and non-HA.
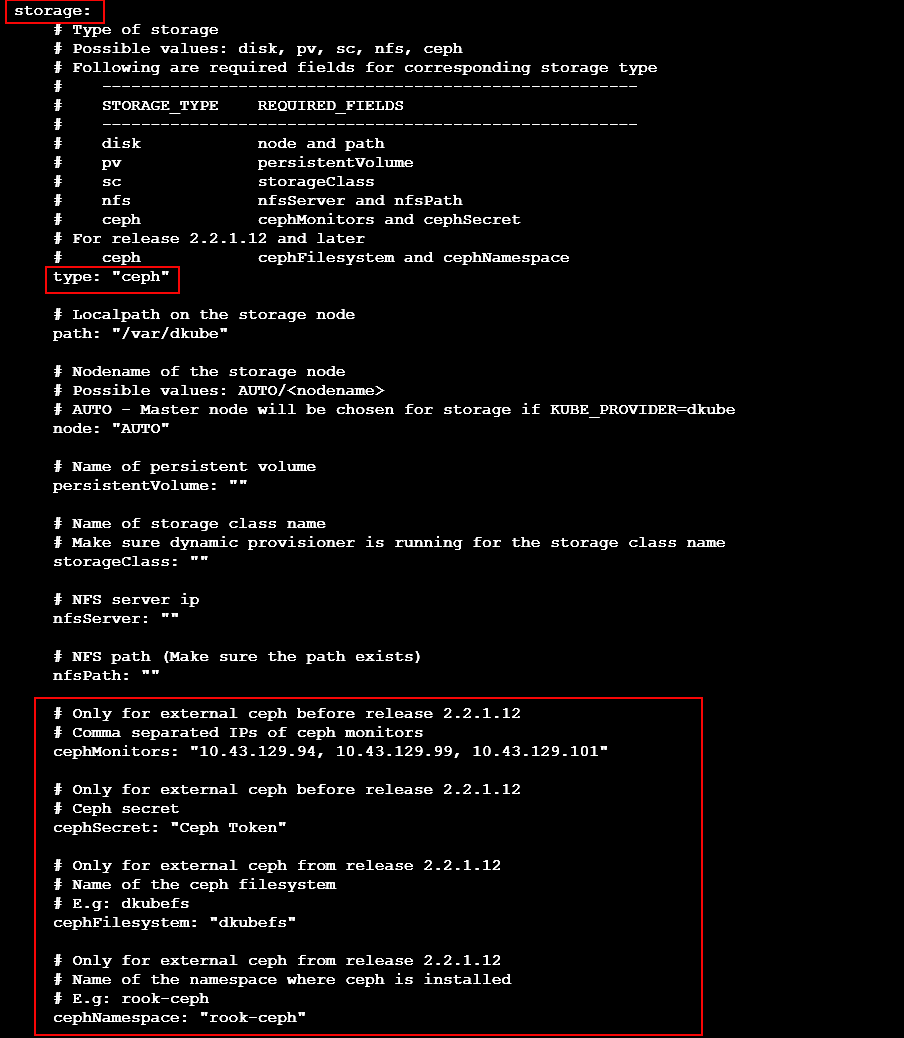
Field |
Value |
|---|---|
type |
ceph |
cephMonitors |
IP addresses of the Ceph monitors - must be 3 |
cephSecret |
Ceph token |
cephFilesystem |
Ceph file system name |
cephNamespace |
Ceph namespace |
Note
Some of the Ceph fields are used in versions of DKube prior to 2.2.1.12, and some apply starting with 2.2.1.12
The command to get the Ceph file system name is:
The command to get the Ceph namespace is:
Load Balancer Options
Load Balancer options are configured in the loadbalancer section of the file. The fields should be configured as follows, depending upon the load balancer installed.
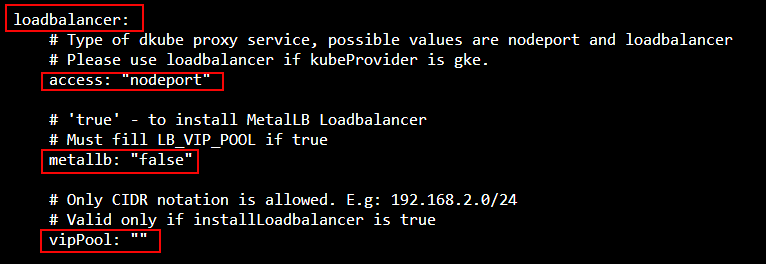
Use the following configuration if the cluster is accessed by:
The IPs of the cluster nodes, or
By a VIP on a load balancer that is external to the k8s cluster
Field |
Value |
|---|---|
access |
nodeport |
metallb |
false |
If the cluster is accessed by the MetalLB load balancer provided by DKube, use the following configuration:
Field |
Value |
|---|---|
access |
loadbalancer |
metallb |
true |
vipPool |
Pool of IP addresses used to provision the VIPs for the load balancer |
If the cluster is accessed by a user-deployed load balancer that is aware of the k8s cluster, use the following configuration:
Field |
Value |
|---|---|
access |
loadbalancer |
metallb |
false |
CI/CD
DKube provides the ability to automatically build and register Docker images based on a set of criteria. The configuration is controlled by the CICD section of the file.
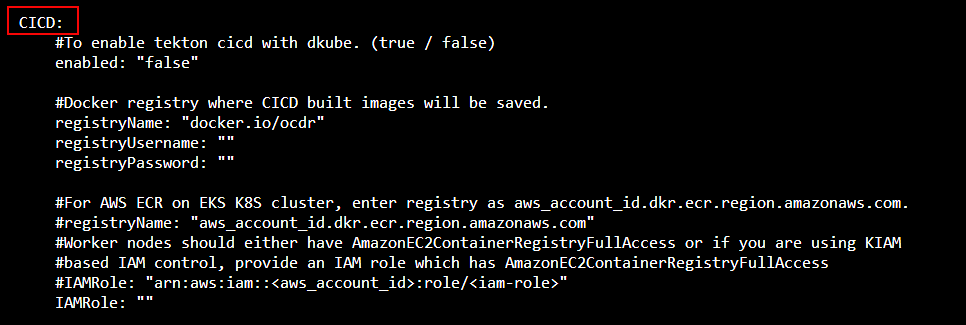
The following fields should be changed to enable CICD. The other fields should be left in their default settings.
Field |
Value |
|---|---|
enabled |
true to enable CI/CD |
registryName |
Name of the Docker registry to save images |
registryUsername |
Username for Docker registry |
registryPassword |
Password for Docker registry |
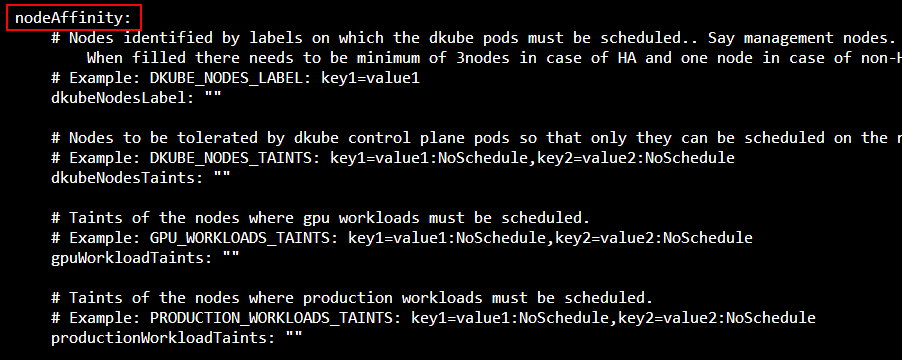
Node Affinity
DKube allows you to optionally determine what kinds of jobs and workload types get scheduled on each node in the cluster. For example, you might want certain nodes to be used exclusively for GPU-based jobs, or you might want some nodes to be used only for production serving. This control is based on directives that you provide to DKube during installation, which then match up with the node affinity capability built into Kubernetes.
Node affinity is configured in the nodeAffinity section of the file.
Note
The node affinity capability is optional. If no directives are given to DKube, any job or workload can be run on any node in the cluster.
Node Affinity Usage
This section provides the details on how to use the node affinity capability, with an example.
The node rules are provided in the [NODE-AFFINITY] section of the values.yaml file, described later in the guide. An example of this section is provided here.
nodeAffinity:
# Nodes identified by labels on which the dkube pods must be scheduled
# Example: dkubeNodesLabel: key1=value1
dkubeNodesLabel: management=true
# Nodes to be tolerated by dkube control plane pods so that only they can be scheduled on the nodes
# Example: dkubeNodesTaints: key1=value1:NoSchedule,key2=value2:NoSchedule
dkubeNodesTaints: management=true:NoSchedule
# Taints of the nodes where gpu workloads must be scheduled.
# Example: gpuWorkloadTaints: key1=value1:NoSchedule,key2=value2:NoSchedule
gpuWorkloadTaints: gpu=true:NoSchedule
# Taints of the nodes where production workloads must be scheduled.
# Example: productionWorkloadTaints: key1=value1:NoSchedule,key2=value2:NoSchedule
productionWorkloadTaints: production=true:NoSchedule
Within the configuration file, there are 2 types of field designations:
LABEL |
Identified job types can only be scheduled on nodes with this label, but a label does not prevent other job types from also being schedule on the node |
TAINT |
Identified job types are the only job types scheduled on nodes with this taint |
The definitions in the configuration example file above creates 3 types of nodes:
management |
Management node |
gpu |
Node that will run a GPU job |
production |
Node that will handle production jobs |
So, in this example:
Since the dkubeNodesLabel has “management=true”
Control jobs can only be executed on nodes with the “management” label, but
Worker jobs can be scheduled on any node, including the nodes with the “management” label
Since the dkubeNodesTaints has “management=true:NoSchedule”, control jobs are the only jobs that can be scheduled on nodes with the taint
Assigning a Label
Node labels restrict certain job types to run only on that node, but do not prevent other jobs from also running on that node. In order to assign several nodes the “management” label, the command would be:
kubectl label node <node-1> <node-2> management=true
Assigning a Taint
Node taints restrict certain job types to run only on that node, and prevent any other job type from running on that node. In order to assign several nodes the “management-only” taint, the command would be:
kubectl taint node <node-1> <node-2> management=true:NoSchedule
Model Monitor
Note
This feature is only active in version R3.x
To enable the menu and operation for model monitoring, the monitoring option should be set to true.

External Database
Note
This feature is only active in version R3.x
By default, DKube uses an internal MySQL server. An optional external MSSQL or MySQL database server can be used instead by using the DBAAS configuration section.

The syntax for the DSN section is explained at Connecting to a Database
For reference, the syntax will appear as follows:
Field |
Definition |
|---|---|
sqluser |
Username |
sqlpassword |
Password |
sqlserverhost |
Server hostname or IP address |
dkubedb |
database name for DKube |
Helm-Based DKube Installation
After the installation options have been completed, a Helm-based installation in executed. The Helm install uses the following rules for installation:
If no yaml file is provided in the command line, the values are taken from the Helm chart
If a yaml file is provided in the command line using the “-f <yaml file>” flag, the values in the yaml file will override what is in the chart
Specific values can be provided in the command line using the “–set” flag
The different approaches can be combined:
The values from the “-f <yaml file” will override what is in the Helm chart
The values using “–set” will override the yaml file
In general, the right-most value will be given priority
Note
Upgrading, uninstalling, and reinstalling DKube are covered in the sections Upgrading DKube, Uninstalling DKube, and Reinstalling DKube
The following command will install DKube based on the values in the values.yaml that was configured above.
The Release Name in the command is a Helm identification that is used identify the installation for status, upgrade, & uninstall.
Installation Status
The status of the installation can be viewed with the following command:
Note
The Release Name is the same name that was used during installation. The complete list of Helm installation Release Names can be obtained using the helm list command.
Installation Dashboard
The progress of the installation can be viewed from the installation dashboard. The link to the dashboard is based on the platform type.
The installation dashboard is accessible from the public IP address of the master node. The IP is of the form:
The installation dashboard is accessible from the public IP address of the master node. The IP is of the form:
The installation dashboard is accessible from the Installer load balancer IP address. The IP is of the form:
In order to get the IP address to fill in, the following command should be run:
Dashboard Status
The dashboard will show the status of COMPLETED when DKube has been successfully installed.
If the installation in successful, the dashboard will show the status of COMPLETED.
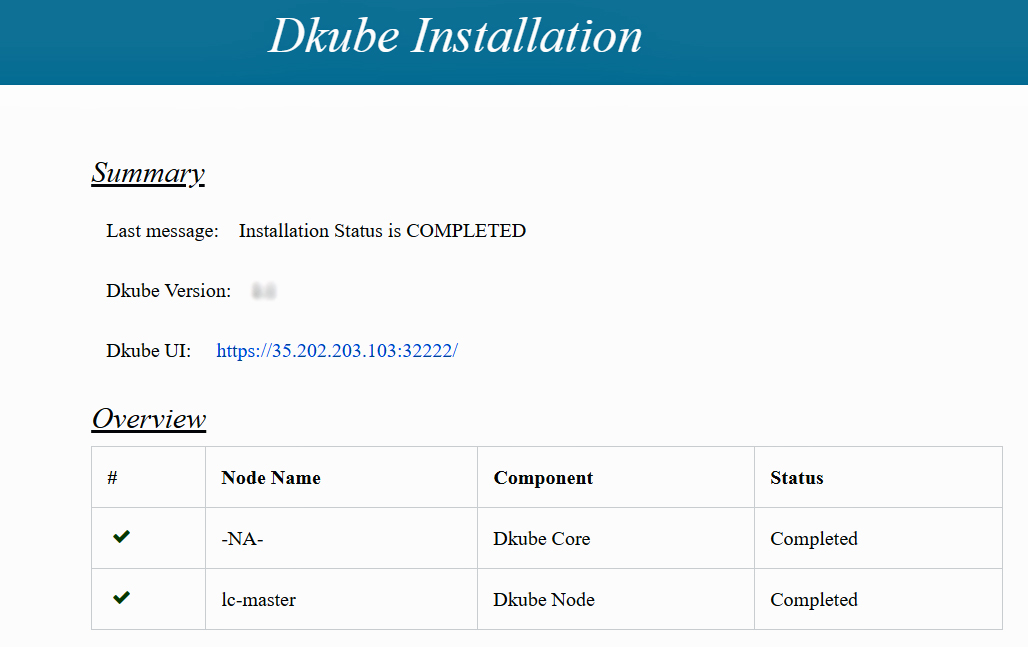
Accessing DKube
After the DKube installation dashboard shows that the installation has completed, the DKube UI is shown as part of the dashboard. DKube can also be accessed directly based on the platform type.
DKube is accessed from the public IP address of the master node. The IP is of the form:
DKube is accessed from the public IP address of the master node. The IP is of the form:
The DKube url can be obtained by running the following command:
The output of that command should be put into the following url format:
Initial Login
The initial login after installation is accomplished with the username and password entered in the values.yaml file. Authorization based on a backend mechanism is explained in the User Guide User Guide at DKube User Guide